Here is a bit of a WIP on a four inch drop point I have just finished. It will have a full flat grind and a tapered tang. And sambar stag on the handle
First I trace the stencil onto a flat bar stock piece of ATS-34.

I cut the blade roughly to shape on the bandsaw and then grind it down to its final profile with 60 grit.

I mark out the pin holes for the handles and centre punch them

Drilling the holes in the handle

Pin holes drilled in handle and holes to lighten the handle.

Then I grind the small piece of steel in front of the bolster that isn’t going to be ground in the flat grind. And finish to 400 grit

Here I am hollowing out the handle to do a tapered tang

I now make the tapered dang flat on each side. The reason for hollowing it out is to make it easier to do the flattening as there is less steel to remove.


Now I take a few hollows out of each side to do the flat grind. The hollows do the same in this step at they do when I do the tapered tang.


Here’s a picture of it finished to 400 grit on the grinder. I work through the grits 50, 240, 400grit.


Now I hand polish to get all the scratches running the one way along the blade, I do this to 400grit before heat treatment.


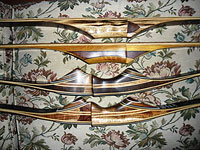
Here it is back from heat treatment with another one I had done at the same time.

I clamp the knife to a piece of timber that I have mounted in a bench vice

Start to sand with 400 grit. The piece of steel is surface ground on the other side so it is perfectly flat.

400grit finished

800 grit finished. I finish the 800 going in a different direction then the 400 so I can make sure all the 400 scratches are out.

1200 grit finished

2000 grit finished

I repeat that on the other side and then go to the cloth buffing wheel.
I use a sown wheel with a medium compound to start

Then go to an unsown wheel with a fine compound.


I then start on bolsters. I use 416 stainless.
Here I have marked it out for the cut.

In the proses of cutting them out

Cut out and one side sanded flat

I’ve got one clamped to the knife drilling the 3/32 holes for the pin. Do this to both bolsters

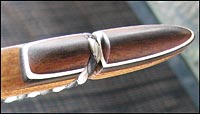
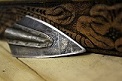
Here I have a 2.5mm drill bit and I go half way through the bolster. This creates a bit of a cavity for the pin to fill in when it is pened.

Grinding the front and back to right angles.

Sanding front to 400 on grinder then to 1200 by hand. Finish on the cloth buffing wheel

Forgot to take a couple of pics here but IV peened the bolsters on and shaped them to roughly what they will finish at.

I decided to use some samba antler for the handle.

I split it down the centre on the bandsaw.

Outline the knife handle on the inside of the antler.

Grind down to your handle line and you are left with a thick white bit on the inside.

I cut the white bit off and then sand it to make sure it is flat.

Now I cut out some red fibber for my liners and they are ready to glue onto the samba.

Now it is time to add the red spacer to the antler.
I glue and clamp the red spacer to the antler

I then flatten the face of the antler up again to bring the spacer flush with the antler


Then I glue the front spacers on.

And grind them back flush with the bottom of the first spacer. This makes a nice sharp corner so you don’t have any gap when it comes to the finish.


I then clamp one side of the handle tang and drill the ¼ inch lanyard hole and the four 3/32 inch holes for pins.

I also drill out a few holes going through the spacer to the antler so that when the handle is glues there is direct glue contact from the steel tang to the antler.

Both sides done ready to be glued

Pins cut and ready

All glued and in clamps

Now it is taken out of clamps ready for the handle to be shaped

Shaped on the grinder with 60 grit


Shaped on grinder to 400 grit

Some of the pins stick up a little so i use a dremel tool to take the pin down

I sand the bolster back to 2000 grit by hand

Sand the steel around the edges back to 2000

Here it is ready to be buffed

Buffed ready for sheath and etching

Now I do the etching
Here’s my gear that I use, it’s a personalize plus etching machine.

Here are the stencils i use they get taped to the blade with electrical tape

In the process of etching. There is a chemical that you put onto the etching pad. This eats the steel away that is through the stencil. And then it is switched to mark and the electrode current is switched around and this puts the black into the mark.

After etching has finished

Cleaned the blade off with the cleaner that takes the acid off.

The drop point and another little one i did at the same time

Now it’s up to doing the sheath.
I make a stencil out of paper to begin with.

Then i cut it out to the lines using a band saw. It’s a small GMC one that i have an 18 tpi blade on.

The knife sitting on the leather cut out

I then wet the sheath down in warm water to wet mould it to the knife. I wrap the knife in cling wrap so it doesn’t attract to much water


The sheath moulded around the knife.

I then cut out the welt. It has a double layer at the top to accommodate the handle better.

I mark out the sheath with a red pen and then do some stamping on it.

I use a contact bond to glue my sheaths together. I glue the belt loop on

I then mark out where my holes will be

I use my pedestal drill to drill the holes. I use a 1mm drill bit.

I then stitch it in and put my stamp in the sheath

I glue the welt in and then i put a rivet in the top which helps to keep the leather together

A picture of the welt in the sheath

I use a marking tool that takes a groove out around the edge of the sheath for the stitching to sit in

I then use a wheel which puts little dints in the groove for the holes to go into

I then drill all the holes

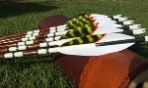
And stitch the sheath and here a pic of the knife in it.

The sheath stained up and finished and with a coat of block out on it. Knife is sharpened up and cleaned.


Thanks for looking