First, the client needs to select the type of timber he wants his new bow to be made from. For this recurve, I am using West Australian Jarrah and American White Ash which has been cooked in a kiln to turn it into a very dark brown timber with striking grain patterns. Once this process is complete, the wood is then called Cambia. With my riser guide, I trim identical curved trenches in both riser blocks which you can see in photo 1.
- Photo 1.JPG (134.83 KiB) Viewed 3719 times
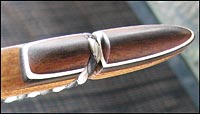
I then use the trenches as a guide to cut the riser blocks on the bandsaw into three pieces and using a router, I trim the waste off to leave a perfectly smooth curved surface for gluing. I swap the centre piece of both riser blocks over which leaves me with two opposing coloured risers. For this bow I'm using black and white phenolic strips between the three pieces of riser for accent strips as you can see in photo 2.
- Photo 2.JPG (162.39 KiB) Viewed 3719 times
Next come the limbs. All Ranger Bows recurves and longbows have a core limb timber (lams) made from compressed Bamboo floor boards which are cut and sanded to length, width and thickness on the bandsaw and then finished on the table sander. The thickness of the lams and other limb components will determine the final poundage of the bow. For this particular bow, the client wants around 55# @ 30”. Bamboo gives the bow a beautifully smooth draw and release and has been used in the construction of bows for hundreds of years. I then use the same process to make the limb veneers which are sanded down to a very thin 0.5mm thickness. For the veneers on this bow, I used African Rengas. The limb wedges are cut and sanded to a paper thin taper. Once all components of the limbs have been made, they need to get baked in the oven for over an hour to ensure no moisture is left in the timber that may ruin the gluing process.
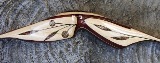
The limb components (photo 3)
- Photo 3.JPG (172.08 KiB) Viewed 3719 times
The riser is taken out and cleaned up and the two limb surfaces are planed perfectly square with each other (photo 4)
- Photo 4.JPG (145.17 KiB) Viewed 3719 times
- Photo 5.jpg (94.94 KiB) Viewed 3719 times
The riser is cut to shape on the bandsaw (photo 6)
- Photo 6.JPG (120.61 KiB) Viewed 3719 times
- Photo 7.jpg (84.4 KiB) Viewed 3719 times
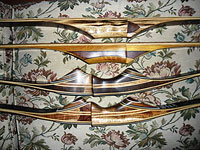
The long and meticulous job of sanding the bow smooth with ever decreasing grades of sandpaper is then completed and several coats of Scandinavian Oil are applied (photo
- Photo 8.jpg (81.6 KiB) Viewed 3719 times
I return to the house to finish the recurve off. Two strings are made for each Ranger Bow and for recurves a stringer is made. I make Flemish twist strings and attach Merino wool silencers and the limbs have suede leather attached close to the ends to lessen the noise of string slap upon arrow release. Suede leather is also attached to the arrow shelf. The last thing to do is write on the bottom limb the bow specs and this bow's unique serial number.
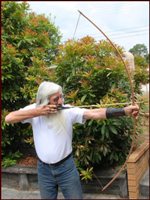
The bow is now finished (photos 9/10)
- Photo 9.jpg (53.81 KiB) Viewed 3719 times
- Photo 10.jpg (62.28 KiB) Viewed 3719 times
Ranger.