Draw Knife build-along - step by step

How to make a Bow, a String or a Set of Arrows. Making equipment & tools for use in Traditional Archery and Bowhunting.

Moderator: Moderators

Post Reply
Message
Author
User avatar
otis.drum
Posts: 972
Joined: Wed Jan 28, 2009 5:30 am
Location: cape york

Draw Knife build-along - step by step

#1 Post by otis.drum » Mon Jul 01, 2013 11:51 am

Hi Guys,
I have been without any real bow making tools in the past, and with the price of new and second hand draw knives I thought I would have a go at making one. I rarely allow myself the time to stop and take photos when I am busy making things, but this time I forced myself to get a snap here and there along the way. I think it is important we share these things.
0275.JPG
0275.JPG (115.93 KiB) Viewed 4775 times
This will be long, detailed and picture heavy. It will take me several posts to get it all up, so please bear with me. I hope you enjoy and that this may help or encourage someone to have a go at making one or something similar.

I came about two pieces of metal in the scrap metal bin here at work. It appears to be quite hard, springy and has been used as a wear plate in a chute at our mine site here in Weipa, so I am guessing it is quite hard and/or abrasive resistant - we mine Bauxite here in Weipa, which is very abrasive. I had been thinking for a while that I needed some better cutting tools, especially to help remove bark and sapwood from freshly harvested 'green' staves, and this looked like the perfect opportunity. Obviously not everyone has access to this material, so if you are wanting to do the same, out there in the real world, I would suggest an old leaf spring off a car, or just going to any engineering shop, and asking for a piece of high carbon flat bar. The dimensions of these pieces were 600mm x 70mm x 6mm = perfect!!
0010.JPG
0010.JPG (169.98 KiB) Viewed 4778 times
Most of our files at work have had their wooden 'push-on' handles replaced with blue, hard plastic, screw on types, so I also had access to a couple of fairly newish wooden handles that had been removed and were being thrown out. I hoped to be able to utilise these to give a comfortable and aesthetically pleasing finish.
0012.JPG
0012.JPG (153.04 KiB) Viewed 4778 times
So Saturday afternoon I got about setting up and planning the attack. To start with, I laid my flat bar out, measured up and drew on my draw knife design. As you can see in this picture I have bent the handles towards the end. This is not the finished shape, but is simply done to get a little bit of extra length in the handles. I will return to this area for straightening and shaping later on.
0015.JPG
0015.JPG (173.97 KiB) Viewed 4778 times
Like always I didn’t want to upset the temper of the steel (although later I did – which I will explain then), so my first cuts on this piece were to the blade area itself. I used an angle grinder, with 1mm cutting disk, and very slowly cut it to shape. This is done by doing one shallow run with the disk and then cooling the metal with a wet rag before doing a second pass. Each pass with the grinder is extremely gentle and soft, taking only a small amount of thickness each time, so as not to damage the steel through heating. I will guess it took around 50-60 passes to cut though 6mm of steel, so quite slow going.
0020.JPG
0020.JPG (154.1 KiB) Viewed 4778 times
You can see how I have been wetting the steel after each run, and it is not evaporating off – so it hasn’t been overheated. Two things are important here - 1) you don’t want to heat the metal up and then quench it in water to cool as this is overheating the metal. 2) you don’t want a running hose or too much water on the piece while you are cutting with electrical equipment – electrical hazard. Simply cool it off with a wet rag between runs and wipe excess water away before doing the next pass.
0025.JPG
0025.JPG (153.68 KiB) Viewed 4778 times
Now that the blade area had been cut out I could move on to cutting the rest of the shape out. The temper of this metal in these areas is not nearly as important and so I did not need to do this slowly, nor cool it between passes. The only thing to watch for here is that the steel doesn’t get hot enough that the colour of the metal at the blade area starts to change colour. If it does, then stop and cool before it gets too hot.
0030.JPG
0030.JPG (161.15 KiB) Viewed 4778 times
I used a piece of wet towel to cool the metal between passes, to avoid overheating the metal.
0035.JPG
0035.JPG (192.61 KiB) Viewed 4778 times
You can see in this picture that the fine cut off on the back of the handle has been well overheated and has changed colour to bluish purple. You must avoid this happening near the cutting edge.
0040.JPG
0040.JPG (175.86 KiB) Viewed 4778 times
The roughed out draw knife.
0045.JPG
0045.JPG (122.29 KiB) Viewed 4778 times
Last edited by otis.drum on Mon Jul 01, 2013 12:16 pm, edited 1 time in total.
...otis...

User avatar
otis.drum
Posts: 972
Joined: Wed Jan 28, 2009 5:30 am
Location: cape york

Re: Draw Knife build-along - step by step

#2 Post by otis.drum » Mon Jul 01, 2013 11:55 am

As I said earlier the shape of the handle were to gain a little more length, however if I ever planned on getting my wooden handles on I needed to get these straight first. I used a couple of approaches to achieve this.
0050.JPG
0050.JPG (135.41 KiB) Viewed 4777 times
Firstly I placed the handle in the vice and applied heat from an $8 butane torch (ebay) than attaches straight to the top of the little camping butane canisters. As the temperature rose, I would tighten the vice up. These torches claim up to 1300*C, and on the thin handles I was able to achieve red hot. This method saw the handle straightened about 70%.
0053.JPG
0053.JPG (134.16 KiB) Viewed 4777 times
0055.JPG
0055.JPG (146.69 KiB) Viewed 4777 times


Secondly I placed the handle, still hot, on a piece of plate steel and hammered them as flat as I could get it. This saw the handles straightened to about 95%.
0060.JPG
0060.JPG (139.33 KiB) Viewed 4777 times
The third process I will come to in a minute, but here you can see the rough finished shape with straightened handles.
0065.JPG
0065.JPG (184.5 KiB) Viewed 4777 times
While I was waiting for the handles to cool down so I could continue with them I ground back the top surface of the draw knife, to prepare it ready for shaping the blade edge in a couple of steps time.
0070.JPG
0070.JPG (172.1 KiB) Viewed 4777 times
Now, getting back to straightening my handles out enough to allow me to fit the wooden file handles - The third step was simply grinding them to be flat, straight and the right size. The trick here is that when I marked the shape of the knife out, I allowed a bit of extra width in the handles to ‘play with’ when finishing. Because I had left them thicker I was able to grind the last of the slight curve out of them, ready to accept the wooden handles, as you can see here.
0075.JPG
0075.JPG (162.04 KiB) Viewed 4777 times
Then I drilled out the handles to the desired size- a close but not tight fit. I did this carefully making sure I was inline on both axis to be sure I was drilling straight down the handle.
0077.JPG
0077.JPG (133.38 KiB) Viewed 4777 times
I drilled from both ends to make the handles push on all the way.
0080.JPG
0080.JPG (116.72 KiB) Viewed 4777 times
...otis...

User avatar
otis.drum
Posts: 972
Joined: Wed Jan 28, 2009 5:30 am
Location: cape york

Re: Draw Knife build-along - step by step

#3 Post by otis.drum » Mon Jul 01, 2013 12:00 pm

When you are using a file the ‘filing’ stroke is when you push the file away from you, so with each stroke you are essentially pushing the handle on. With a draw knife the cutting strokes are when you are pulling the knife back to you, so essentially you are pulling the handles off. I didn’t want the handles pulling off every time I used the knife.
0085.JPG
0085.JPG (152.94 KiB) Viewed 4775 times
This meant that I needed some way of holding/retaining the handles in place. I wasn’t keen to thread the end of the handle and place a nut there to retain it, as I felt this would take away from the overall appearance of the finished tool. I will come back to this step in a little while.
0090.JPG
0090.JPG (101.47 KiB) Viewed 4775 times
Before I could fix the handles and bend them into shape, I felt that I needed to shape the bevel on the blade. If I had waited until the handle were finished and bent into place, I would have crowded my access to the blade are by having a handle just passed each end of the blade. With the metal 6mm thick, and quite hard, a file or stone were not practical ways of achieving/shaping a bevel for the blade, therefore I needed to use what I had at my disposal – a 5” angle grinder and flap disc. So I clamped the handles to the bench with the blade hanging over the edge. A website I looked at sasid that draw knives should be sharpened to between 20 – 30 degrees. 20 for soft wood, 25 for an all-rounder and 30 for hardwood. I didn’t measure mine, I just went with what looked good. I would say it is ever so slightly steeper than a carpenter’s chisel, but not by much.
0100.JPG
0100.JPG (178.71 KiB) Viewed 4775 times
With very even sweeps along the full length of the blade, I began to shape the bevel. Holding the disc at just the right angle and with very little pressure I did several dozen passes, stopping to cool the metal with a wet rag after each pas, again not wanting to overheat the blade. I was able to get the bevel very accurately ground to about 95% complete. This left an edge about 0.5mm thick – as far as I was willing to risk with a flap disc on a grinder. I pulled here as thinning the blade beyond this with a grinder runs the risk of overheating the blade as it become thin, and overgrinding/uneven grinding and leaving a blade that requires hours and hours of filing or stoning to get right.
0102.JPG
0102.JPG (130.27 KiB) Viewed 4775 times
I then tapped up the blade edge with several layers of duct tape and masking tape to protect it from damage during the rest of the build.
0104.JPG
0104.JPG (108.93 KiB) Viewed 4775 times
0105.JPG
0105.JPG (155.24 KiB) Viewed 4775 times
So getting back to the handles issue – I needed to secure them on somehow.
0110.JPG
0110.JPG (135.95 KiB) Viewed 4775 times
I decided to build up some weld on the ends, slightly larger than the diameter of the holes through he handles. I realise this is a little crude, but I was stuck for other ideas. If u had a forge I would have twisted the handles to give them a spiral like a drill bit to ‘screw’ the wood onto, but I don’t.
0125.JPG
0125.JPG (142.4 KiB) Viewed 4775 times
I did a little peening while the weld was red to shape the end as I wanted, and then allowed the weld to cool a little
0132.JPG
0132.JPG (115.6 KiB) Viewed 4775 times
When I felt the temp was right I pulled the handle onto the weld and let it burn its way in to the desired depth, and cooled in a bucket of water when I was happy with the position. Don’t be too surprised when your handle catches fire during this process, they won’t burn away instantly, just get them where you want them then dunk in water to cool.
0134.JPG
0134.JPG (121.71 KiB) Viewed 4775 times
...otis...

User avatar
otis.drum
Posts: 972
Joined: Wed Jan 28, 2009 5:30 am
Location: cape york

Re: Draw Knife build-along - step by step

#4 Post by otis.drum » Mon Jul 01, 2013 12:05 pm

There were a couple of points along the way that made me a little nervous, and this next one was one of them. I needed to take the straight handles with wood attached and bend them at right angles. This posed two problems – 1) I had to heat the handles to allow them to bend to right angle – which meant getting them quite hot, and spring and hard steel don’t like to bend otherwise, so I was risking the metal snapping a the bend (I realise it sounds odd that spring doesn’t like to bend, but it doesn’t like to bend past a point), 2) I didn’t want too much heat in that area in case it burnt the wooden handles or heated the blade up, as the area I wanted to bend was near both.
0145.JPG
0145.JPG (146.32 KiB) Viewed 4775 times
I wrapped the wood in wet rag and had my father stand by with a water squirting bottle ready to cool sections if required. I placed the main section of the knife in the vice, and used the butane torch to bring the handle section I wanted to bend up to a dull red heat. When it was ready I bent it up so it pointed in the same direction as the blade. I was quite happy once this step was done without obvious damage.
0150.JPG
0150.JPG (142.36 KiB) Viewed 4775 times
With a little tweaking back and forth to make sure both handles were bent to the same degree and were parallel with both the blade and each other, I was quite happy with the roughly finished shape.
0153.JPG
0153.JPG (112.55 KiB) Viewed 4775 times
That was where I knocked off on Saturday, happy, but knowing I had some hours ahead of me. I felt though that the hardest parts were behind me. On Sunday morning my wife had organised us to be babysitting our mate three young boys from 7am til 1pm. This work stopping exercise didn’t go down to well, but in the theme of ‘not knowing best’, ‘keeping the piece’ and ‘smile and wave’, I thought it best to agree and come along. It’s not that I don’t like babysitting, but that I had my heart set on finishing this piece and trying it out. Our mates have chooks and I we have German Shorthaired pointed - bird dogs or ‘speckled chook eaters’ as my father in-law calls them, but the chooks had a pen and I thought I would bring them along for the morning - Not advised! Whilst there were no casualties had, it was obvious from the get go that the only thing they would be interested in was the chooks – I don’t think they could even hear my voice telling them to “get out”. This coupled with a very low chook pen fence and three young boys who like to check for eggs about every two and a half minutes, made for a fairly nervous first hour. I decided I had had enough and took the hounds home.
0160.JPG
0160.JPG (163.43 KiB) Viewed 4775 times
0165.JPG
0165.JPG (177.68 KiB) Viewed 4775 times
Once the babysitting was three quarters done I told the wife I had to go do some stuff and high tailed back home to play with my tool  looking at the heating around the handle bending job from yesterday I decided to try to get rid of it and give the whole thing a bit of a polish.
0167.JPG
0167.JPG (122.24 KiB) Viewed 4775 times
I used a wire buff attachment on the drill and polished it up well.
0170.JPG
0170.JPG (122.56 KiB) Viewed 4775 times
The metal has some funny marks on it here and there from its former life as a chute liner, like these pit marks on the surface. Other parts of it have a finger print like pattern.
0173.JPG
0173.JPG (96.49 KiB) Viewed 4775 times
I then roughly sanded back the handles. I didn’t want to take out any damages, dents and character so it really was a quick, rough sand.
0180.JPG
0180.JPG (103.44 KiB) Viewed 4775 times
...otis...

User avatar
otis.drum
Posts: 972
Joined: Wed Jan 28, 2009 5:30 am
Location: cape york

Re: Draw Knife build-along - step by step

#5 Post by otis.drum » Mon Jul 01, 2013 12:10 pm

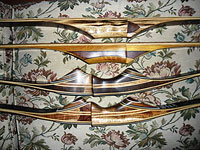
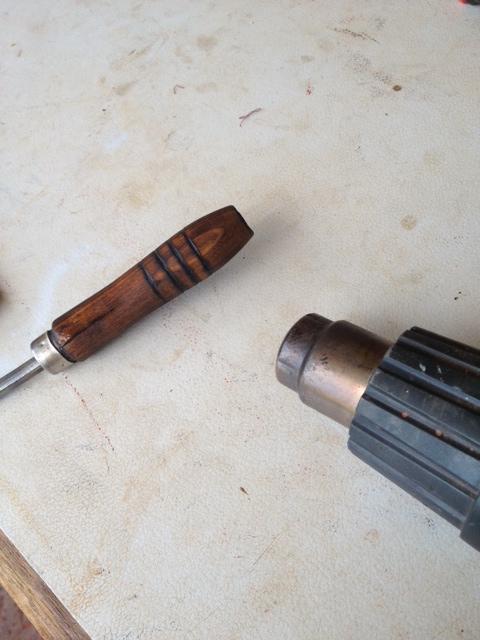
I then used my soldering iron to burn bits and pieces back for an older and more authentic/used appearance. Back in Victoria I have a pyrography burner, which just looks like a soldering iron, but obviously it isn’t as after half an hour of burning wood my soldering iron burn out the element and is now cactus! Anyway, it lasted long enough and got the job done. Here I have burnt the very ends of the handle and up inside the handle the half inch or so up to the knob welded onto the end of the metal.
0182.JPG
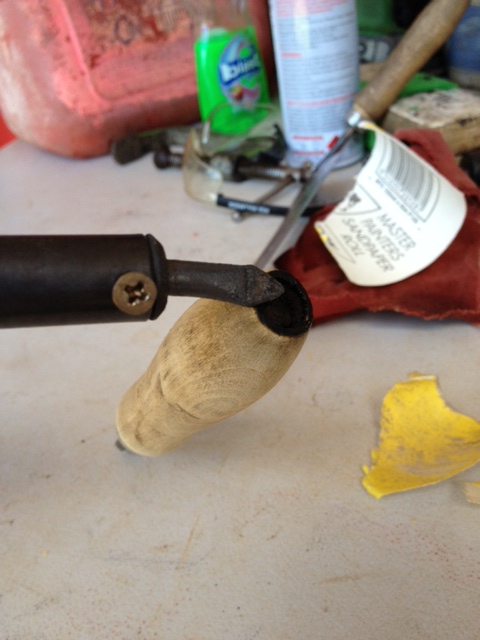
0182.JPG (107.29 KiB) Viewed 4775 times
I also burnt around the little tin ring at the other end of the handle, and some rings around the fatter part of the handle for grip and looks.
0185.JPG
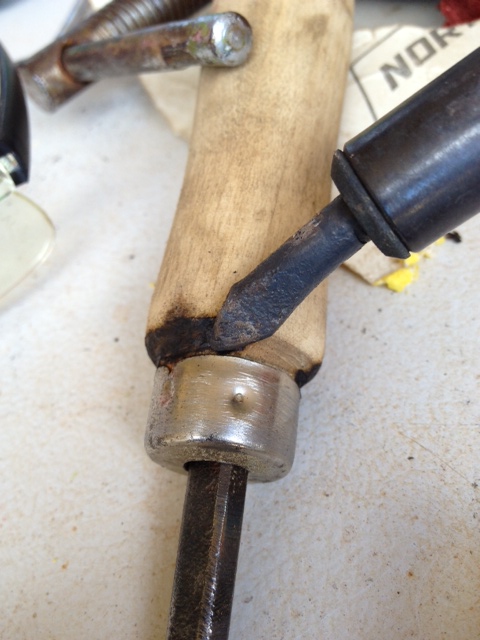
0185.JPG (120.51 KiB) Viewed 4775 times
0190.JPG
0190.JPG (118.92 KiB) Viewed 4775 times
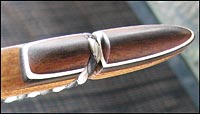
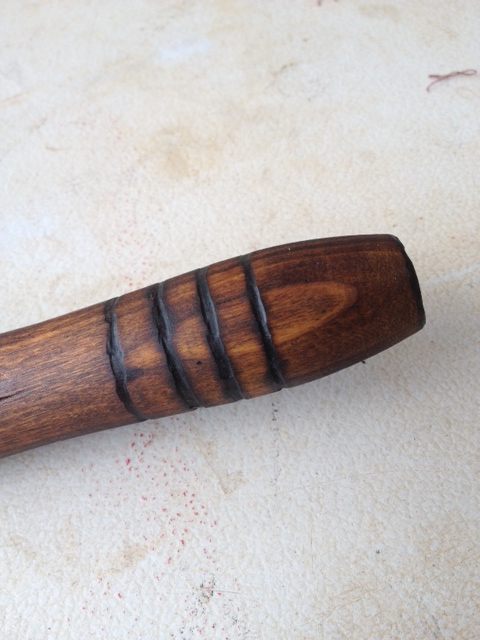
I then rubbed the handles in neat’s-foot oil (through lack of linseed oil), and burnt it on using a heat gun. I did this to darken the wood and bring out the grain as I didn’t like the look of the pale handles.
0195.JPG
0195.JPG (131.98 KiB) Viewed 4775 times
I think it looks much nicer now, and while the rings around the handle are not that neat I quite like their home made, rustic, rough look. I particularly like the darker looking grain.
0197.JPG
0197.JPG (121.34 KiB) Viewed 4775 times
Now came a task that had been making me nervous for some time. I had to go back to the blade that I had 95% shaped with the grinder and finish it with a stone. I wasn’t sure how long this would take, how hard and resistant to wear this metal was, and whether I had just spent the best part of two half-days building something that I could not finish – after all, this was a wear resistant chute lining from a bauxite mine.

I removed the tape and began to stone away. It was slow going as I was trying to remove a portion of metal about 10” long, ¾” wide and 0.5mm thick, but it was slowly coming and I could see that it was going to be achievable.

I had seen one furniture maker discussing how to sharpen these things on youtube, and decided to follow his lead. He tended to sharpen the bevel with a deliberate convex for using the knife upside down in concave applications (for us I could see this as useful around handles and fades), and to also have the underside have the most minute convex just near the blade edge, for control of depth and to stop the tendency for the knife to ‘dig in’.

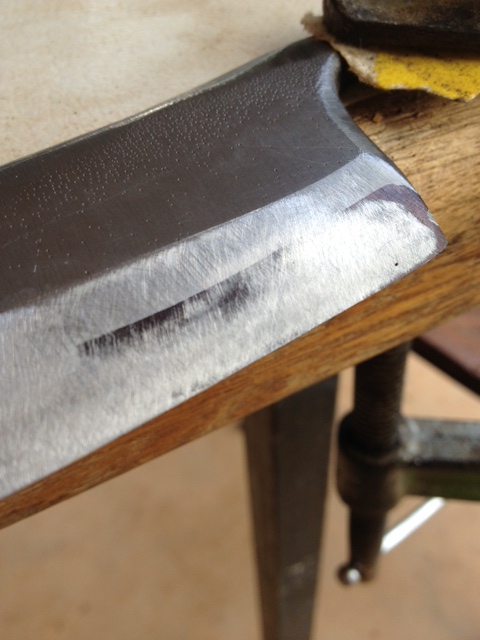
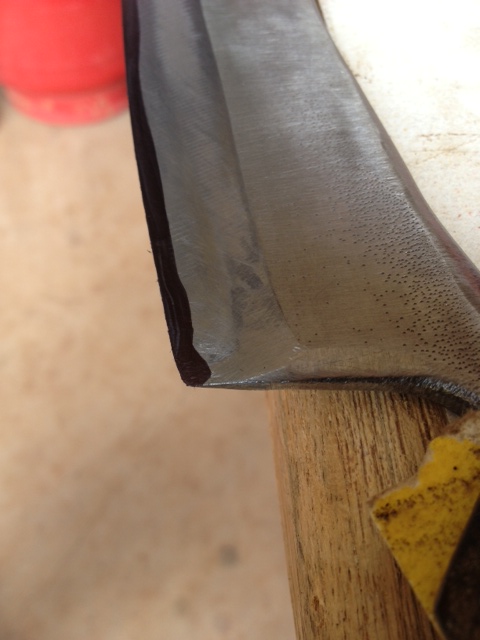
As I got to a point where I was approaching a sharp edge along the whole blade, I shopped, wiped off my water and detergent cutting lube and coloured the bevel in black Nikko pen to show me where my contact was.
0200.JPG
0200.JPG (110.9 KiB) Viewed 4775 times
As I got closer I marked sections I did not want to touch, so I could notice if I was going outside the area I wanted to work. This was handy for showing my high and low points, so I could concentrate my stoning to even the blade up. I must say that good, slow, precise grinding with the grinder saved hours of stoning.
0215.JPG
0215.JPG (103.21 KiB) Viewed 4775 times
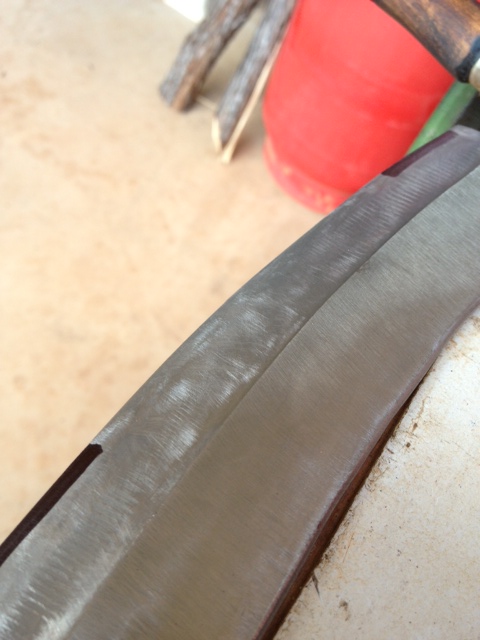
Finally, in finishing the bevel side of the blade I ran a black mark along the edge of the blade and gave it a fine few polished with the finer side of my stone. Before flipping over and stoning the underside as flat as possible, and using the fine stone to finish the edge – with ever so slight convex.
0220.JPG
0220.JPG (96.38 KiB) Viewed 4775 times
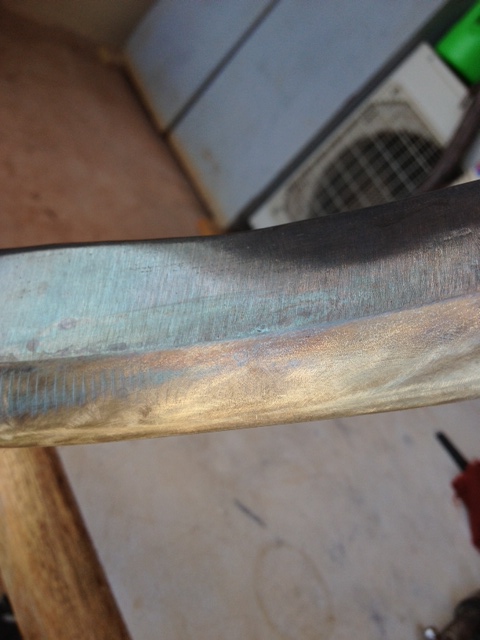
As I mention earlier, I had been trying to avoid damaging/changing the temper of the steel, especially along the blade edge. However, after downloading a couple of PDF’s on blacksmithing last week, I was reading a couple of pages around Annealing, normalising, Hardening and Tempering, and dared to have a go. This was a hard choice for me as I knew I had done an excellent job in keeping the blade cool and retaining its current temper. Both books gave the same advice and so I gave it a go. I grabbed the butane torch and holding onto the handles I heated the whole main body of the knife through the colour schemes from straw, brown, blue, purple etc, to as hot as I could get it, which ended up being a funny pale pinkish bronze colour. I then dunked it into cold water and swirled around to cool it as quickly as possible – Hardening it (I hope).
0225.JPG
0225.JPG (125.55 KiB) Viewed 4775 times
I then fine stoned the bevel face again to take away the colour and bring back the shiny silver of the steel. I did this so I could gage the colour, and therefore heat, of the next heating. Both of my books told me that a ‘carpenter’s chisel’, which is as close to draw knife as I could find, should be heated to 230*C and quenched, and that this equated to a ‘pale straw’ colour. In the process it also describes that this colour is to be achieved along the blade edge, and that to gain an even heat/colour, the bulk/thick metal away from the blade should be heated until the heat and colour work into the blade. This method was much easier than I first thought it would be and I had no trouble getting a good even heat.
0230.JPG
0230.JPG (106.7 KiB) Viewed 4775 times
Last edited by otis.drum on Thu Jul 04, 2013 1:39 pm, edited 1 time in total.
...otis...

User avatar
otis.drum
Posts: 972
Joined: Wed Jan 28, 2009 5:30 am
Location: cape york

Re: Draw Knife build-along - step by step

#6 Post by otis.drum » Mon Jul 01, 2013 12:15 pm

Now, such a sharp blade can’t just be chucked into a toolbox or on a shelf with other things around it – both for personal safety and for the sake of the tool. So I thought it best to have a sheath or cover. I didn’t have any plain leather laying around, so I had to use some cow hide that had a crocodile pattern stamped into it. It’s looks a little ‘Davey Crocket meeting Mick Dundee’ for my liking but it will do the job.
0235.JPG
0235.JPG (160.79 KiB) Viewed 4775 times
0237.JPG
0237.JPG (141.6 KiB) Viewed 4775 times
I used a couple of little brass stud things to hold it in shape.
0240.JPG
0240.JPG (135.01 KiB) Viewed 4775 times
0250.JPG
0250.JPG (135.09 KiB) Viewed 4775 times
The leather where the blade sits has been double over, so hopefully it will not cut through too quickly. If it does I will have to think of something else to line it with. I ran out of press stud buttons and so I can’t finish the flap to lock onto the main section, but I have ordered some off ebay, so I will finish that when they arrive.
0255.JPG
0255.JPG (136.98 KiB) Viewed 4775 times
It fits snuggly in, protects my hands and the blade and looks not too bad.
0260.JPG
0260.JPG (145.49 KiB) Viewed 4775 times
0270.JPG
0270.JPG (152.74 KiB) Viewed 4775 times
Once finished I thought I should give it a try out. This is on a piece of fairly hard wattle that I harvested about a week ago. It certainly seems to do the job, and I look forward to using it.
0273.JPG
0273.JPG (145.04 KiB) Viewed 4775 times
… And finally, here it is, start to finish. Hopefully someone will get the urge to do something similar.
0275.JPG
0275.JPG (115.93 KiB) Viewed 4775 times
...otis...

User avatar
Nephew
Posts: 3046
Joined: Thu Aug 23, 2007 1:28 pm
Location: Coochiemudlo Island,Moreton Bay, Qld.

Re: Draw Knife build-along - step by step

#7 Post by Nephew » Mon Jul 01, 2013 1:38 pm

That's amazing, Otis! Well done mate, I envy your craftsmanship.
Lately, if life were treating me any better, I'd be suspicious of it's motives!

longbow steve
Posts: 3116
Joined: Tue Jan 30, 2007 3:29 pm
Location: BLUE MOUNTAINS

Re: Draw Knife build-along - step by step

#8 Post by longbow steve » Mon Jul 01, 2013 2:50 pm

Wow, pretty awesome. Will be a treasured tool no doubt.
Do you hunt with your GSP's? Steve

Bill
Supporter
Supporter
Posts: 960
Joined: Tue Apr 27, 2004 6:24 pm
Location: Wodonga
Contact:

Re: Draw Knife build-along - step by step

#9 Post by Bill » Mon Jul 01, 2013 2:52 pm

:smile: Very 8) a brilliant job done well, and thanks for the build along guide. I have enjoyed it immensely.

User avatar
bigbob
Posts: 4098
Joined: Sat Jul 10, 2010 8:55 pm
Location: sunshine coast

Re: Draw Knife build-along - step by step

#10 Post by bigbob » Mon Jul 01, 2013 3:37 pm

terrific work, Otis! also enjoyed the build along. Nostalgic hearing about the ol' Weipa as I was a 'boily' in the fixed plant both at Lorim Pt and Andoom way , way back about 30 years ago! Wish you much success on your self bow endeavors!If you approach them in the same manner as your draw knife then you will have undoubted success! :wink:
nil illigitimo in desperandum carborundum
razorbows.com

User avatar
Stickbow Hunter
Supporter
Supporter
Posts: 11637
Joined: Sat Jul 26, 2003 8:33 pm
Location: Maryborough Queensland

Re: Draw Knife build-along - step by step

#11 Post by Stickbow Hunter » Mon Jul 01, 2013 7:07 pm

Excellent Otis!!! I really enjoyed your build-a-long and thanks so much for taking the time to do it. A really great result and I'm sure it has given you great satisfaction in making it.

Jeff

User avatar
Gringa Bows
Posts: 6331
Joined: Thu Aug 30, 2007 7:09 pm
Location: Bundaberg QLD

Re: Draw Knife build-along - step by step

#12 Post by Gringa Bows » Mon Jul 01, 2013 8:58 pm

Great build along Otis :biggrin: :biggrin:

User avatar
terryzac
Posts: 492
Joined: Sun Jul 12, 2009 4:18 pm
Location: south of brizzy

Re: Draw Knife build-along - step by step

#13 Post by terryzac » Tue Jul 02, 2013 7:55 am

Top job otis. Looks just like a bought one. Will have to give it a go myself

Terry

User avatar
otis.drum
Posts: 972
Joined: Wed Jan 28, 2009 5:30 am
Location: cape york

Re: Draw Knife build-along - step by step

#14 Post by otis.drum » Tue Jul 02, 2013 6:18 pm

Thanks guys and no worries Jeff, it really wasn't as hard as i thought it would be. Just need to think through it and take your time.

Steve, after some clarification, no i do not hunt the hounds. They are lap dogs :smile:
...otis...

daniel boon
Posts: 141
Joined: Mon Nov 14, 2011 2:10 am
Location: Nerang

Re: Draw Knife build-along - step by step

#15 Post by daniel boon » Tue Jul 02, 2013 8:48 pm

Nice job on the drawknife, and great buildalong.

User avatar
Flatliner
Posts: 449
Joined: Fri Apr 08, 2011 6:12 pm
Location: Gordonvale NTH QLD

Re: Draw Knife build-along - step by step

#16 Post by Flatliner » Tue Jul 02, 2013 10:18 pm

Great work Otis on both the draw knife and the build-along.

Rob.
The shortest distance between two points is a FLATLINE
ImageEmail; robnicoll(at)bigpond(dot)com
www.flatlinebows.com.au

User avatar
Steven J
Posts: 797
Joined: Fri Apr 27, 2007 10:13 pm
Location: away for a while...
Contact:

Re: Draw Knife build-along - step by step

#17 Post by Steven J » Tue Jul 02, 2013 11:42 pm

First post in a LONG time.

Nice work mate. 'The proof is in the pudding' as they say, so I hope it is working well for you.

Steve
http://www.stevenjawerth.weebly.com

On Christ the solid rock I stand, All other ground is sinking sand. Edward Mote, 1797-1874

User avatar
looseplucker
Posts: 1558
Joined: Tue Jan 02, 2007 10:32 am
Location: Canberra

Re: Draw Knife build-along - step by step

#18 Post by looseplucker » Wed Jul 03, 2013 7:17 am

Nice work Otis - inspiring too.

And great to see you Steven - been a while :smile:
Are you well informed or is your news limited?

User avatar
GrahameA
Posts: 4692
Joined: Thu Mar 10, 2005 4:28 pm
Location: Welcome to Brisneyland, Oz

Re: Draw Knife build-along - step by step

#19 Post by GrahameA » Wed Jul 03, 2013 7:24 am

Morning Otis.

Excellent work. It is good to see people making things.
Grahame.
Shoot a Selfbow, embrace Wood Arrows, discover Vintage, be a Trendsetter.

"Unfortunately, the equating of simplicity with truth doesn't often work in real life. It doesn't often work in science, either." Dr Len Fisher.

User avatar
rodlonq
Posts: 2096
Joined: Wed May 06, 2009 3:02 pm
Location: Ingham NQ

Re: Draw Knife build-along - step by step

#20 Post by rodlonq » Fri Jul 05, 2013 4:14 pm

Great buildalong Otis. Thanks for posting it.

Cheers..... Rod

User avatar
otis.drum
Posts: 972
Joined: Wed Jan 28, 2009 5:30 am
Location: cape york

Re: Draw Knife build-along - step by step

#21 Post by otis.drum » Fri Jul 05, 2013 9:08 pm

thanks guys. i hope to see some more buildalongs up here soon then :biggrin:

SteveJ - your little cabinet scraper build along gave me the urge. thanks.
...otis...

Post Reply