Hey Rob
Its so close, have you fired a shot yet?
Flatline opus 1&2
Moderator: Moderators
Re: Flatline opus 1&2
Politics is a game played by dishonest people to gain an unfair advantage!
Never under estimate the strength of a cornered coward.
Everyone is entitled to be stupid, but some abuse the privilege.
http://www.bowmanstaxidermy.com.au

Never under estimate the strength of a cornered coward.
Everyone is entitled to be stupid, but some abuse the privilege.
http://www.bowmanstaxidermy.com.au

Re: Flatline opus 1&2
Very nice Rob, beyond mere words.........
Cheers..... Rod
Cheers..... Rod
Re: Flatline opus 1&2
Continued from the edit on the last post.
Then carefully ground.
Gaskets are made from 0.7mm Rubber joist flashing using the bingham jig again.
Then with the limbs bolted in place, the riser is made flush with the limbs and all the corners are rounded off.
And it's really starting to come together now, just the string grooves, about a week of sanding and coating, a bit of sign writing, a string and silencers and some strike plates to go 

I unmasked the limbs so they could take their first few breaths .
I see a light ahead
.
I see a light ahead  , Rob.
Then carefully ground.
- SDC11357.JPG (137.11 KiB) Viewed 6386 times
- SDC11366.JPG (187.22 KiB) Viewed 6386 times
- SDC11368.JPG (159.15 KiB) Viewed 6386 times
- SDC11370.JPG (163.38 KiB) Viewed 6386 times
- SDC11372.JPG (73.95 KiB) Viewed 6385 times
I unmasked the limbs so they could take their first few breaths
- SDC11374.JPG (183.29 KiB) Viewed 6385 times
- SDC11375.JPG (104.9 KiB) Viewed 6385 times
- Attachments
-
- SDC11373.JPG (89.86 KiB) Viewed 6386 times
The shortest distance between two points is a FLATLINE
 Email; robnicoll(at)bigpond(dot)com
www.flatlinebows.com.au
www.flatlinebows.com.au
Re: Flatline opus 1&2
Thanks all for your kind words  .
.
No Graydon, I never shoot my bows until they are completely finished. It's an exersise in self disapline and delayed gratification,,,,,,(and I know they're gonna work )
)
Rob.
No Graydon, I never shoot my bows until they are completely finished. It's an exersise in self disapline and delayed gratification,,,,,,(and I know they're gonna work
Rob.
The shortest distance between two points is a FLATLINE
Email; robnicoll(at)bigpond(dot)com
www.flatlinebows.com.au
www.flatlinebows.com.au
-
excelpoint
- Posts: 702
- Joined: Tue Apr 15, 2008 3:20 pm
- Location: Melton, Victoria
Re: Flatline opus 1&2
Lookin real nice Rob.
Re: Flatline opus 1&2
Rob truely a piece of wood work you have produced. If you take it to the Tully shoot this year I would love to take some photos of it for you. The hardest thing for you now I guess is how are you going to top that one mate.
The magic thing about that bow I think is because of the woods you yoused it will always be one of kind.
Thanks for taking the time to post With everyone else it has been much appreciated.
Cheers Wayno
The magic thing about that bow I think is because of the woods you yoused it will always be one of kind.
Thanks for taking the time to post With everyone else it has been much appreciated.
Cheers Wayno
Justastik Arrow Craft, Its all about the Wood.
-
excelpoint
- Posts: 702
- Joined: Tue Apr 15, 2008 3:20 pm
- Location: Melton, Victoria
Re: Flatline opus 1&2
I reckon you would make some real nice photos with that one mate.UPTHETOP wrote:Rob truely a piece of wood work you have produced. If you take it to the Tully shoot this year I would love to take some photos of it for you. The hardest thing for you now I guess is how are you going to top that one mate.
The magic thing about that bow I think is because of the woods you yoused it will always be one of kind.
Thanks for taking the time to post With everyone else it has been much appreciated.
Cheers Wayno
Re: Flatline opus 1&2
Rob, your bows are too good for words, and this one is even better. Thanks again for showing how you make these all the way through from timber to ... speechlessness!
Re: Flatline opus 1&2
Still hanging on the posts Rob, but I am keen to know what the strategically placed "Baby Powder" container in the last couple of pictures does for making a bow. I am pretty sure changing nappied you aint!!
Graydon
Graydon
Politics is a game played by dishonest people to gain an unfair advantage!
Never under estimate the strength of a cornered coward.
Everyone is entitled to be stupid, but some abuse the privilege.
http://www.bowmanstaxidermy.com.au
Never under estimate the strength of a cornered coward.
Everyone is entitled to be stupid, but some abuse the privilege.
http://www.bowmanstaxidermy.com.au
-
littlejohn
- Posts: 120
- Joined: Sun Apr 04, 2010 5:53 pm
- Location: sydney
Re: Flatline opus 1&2
ABSOLUTELY STUNNING.......
AMONGST THE BEST WORK I HAVE SEEN......IF NOT THE BEST.....
Regards...Pete
AMONGST THE BEST WORK I HAVE SEEN......IF NOT THE BEST.....
Regards...Pete
Re: Flatline opus 1&2
Rob ,how long have you been making bows?I mean your obviously good at it and I am wondering howcome I never heard of you before.
Did your bows go by a brand name before or have you previously just made them for yourself or what?
Jeff
Did your bows go by a brand name before or have you previously just made them for yourself or what?
Jeff
Re: Flatline opus 1&2
Thanks one and all for such edifying comments, I feel a little humbled and embarrassed by such praise  .
.
Hey Jeff, I made my first self-bow just over three years ago and my first composite bow two years and eight months ago, but I have a thirty year head start in working with timber (and loving it) and I've been completely obsessed with bow making ever since. This is my 29 th composite bow. The reasons you haven't heard of me is explaned in the "A look at Flatline" thread in shooting the breeze. (you might have to scroll down a fair way)
Yeah your right Graydon, not changing nappies .
It's used as a lubricant between the block that supports the file and the bench when doing the limb fit, it also works well on saw benches to help the timber slide when doing tricky cuts, you can't use oil grease or wax for obvious reasons.
I'll definitely be taking it to Tully Wayno, (gota show off a bit hey ) and you're very welcome to take photos and have a shot or 20. I'll also be taking my take down demo kit and a few Flatliners, so if anybody is real keen to see, shoot and find out more about Flatline Bows keep an eye out for the dates and I'll see you there.
It occures to me I didn't go through the knock tips and string groove processes, so here they are.
The knock tips are roughly reshaped using the same method as before, being carefull not to change there depth.(I always mask the edge of the limb When gluing the knock tips and other overlays on, it then becomes a guide so you know that you have come to the original surface when shaping them. Then with the limb clamped to the bench, file a groove at a right angle across the back of the knock a couple of mil away from where it will finish.
Using flat and round files and strips of cloth backed sand paper of various grades, 20 minutes later We've got this .
The string grooves are made by marking an acurate line down the center of the overlay, and with the hacksaw remove it by cutting a shallow groove making sure not to cut into the glass.
The groove is veed using a square file.
And using progressively biger round files, create a groove that will fit the thick part of the string.
Then round all of the sharp edges with 180 paper.
Here's a handy hint, when gluing overlays on don't wipe all the glue from where they join the glass. Leave a little and run your finger tip lightly over it to cove it to the glass and sand smooth when it's dry.
I did the draw force curve on the bow last night, the best curve yet so it should be extra sweet to shoot and it's come out at exactly 53# @ 28" .
If I can remember how to operate my scanner I'll post it.
..... ....... .....
  ...... ...... ...Got it sussed. Isn't that the sweetest curve you've seen? ....... It'd almost make a good limb shape
  .
The fact that the feature in the string groove overlay lines up perfectly with the string groove in the knock tip is pure ass .
.
The fact that the feature in the string groove overlay lines up perfectly with the string groove in the knock tip is pure ass .
Rob.
Hey Jeff, I made my first self-bow just over three years ago and my first composite bow two years and eight months ago, but I have a thirty year head start in working with timber (and loving it) and I've been completely obsessed with bow making ever since. This is my 29 th composite bow. The reasons you haven't heard of me is explaned in the "A look at Flatline" thread in shooting the breeze. (you might have to scroll down a fair way)
Yeah your right Graydon, not changing nappies
It's used as a lubricant between the block that supports the file and the bench when doing the limb fit, it also works well on saw benches to help the timber slide when doing tricky cuts, you can't use oil grease or wax for obvious reasons.
I'll definitely be taking it to Tully Wayno, (gota show off a bit hey
It occures to me I didn't go through the knock tips and string groove processes, so here they are.
The knock tips are roughly reshaped using the same method as before, being carefull not to change there depth.(I always mask the edge of the limb When gluing the knock tips and other overlays on, it then becomes a guide so you know that you have come to the original surface when shaping them. Then with the limb clamped to the bench, file a groove at a right angle across the back of the knock a couple of mil away from where it will finish.
- SDC11341.JPG (105.24 KiB) Viewed 6304 times
- SDC11352.JPG (117.85 KiB) Viewed 6304 times
- SDC11380.JPG (143.19 KiB) Viewed 6297 times
- SDC11382.JPG (85.66 KiB) Viewed 6297 times
- SDC11383.JPG (84.88 KiB) Viewed 6297 times
- SDC11386.JPG (97.65 KiB) Viewed 6297 times
- SDC11388.JPG (93.16 KiB) Viewed 6297 times
- SDC11389.JPG (82.68 KiB) Viewed 6297 times
I did the draw force curve on the bow last night, the best curve yet so it should be extra sweet to shoot and it's come out at exactly 53# @ 28"
If I can remember how to operate my scanner I'll post it.
.....
- Image.jpg (66.26 KiB) Viewed 6294 times
Rob.
Last edited by Flatliner on Sat Jun 25, 2011 11:43 pm, edited 8 times in total.
The shortest distance between two points is a FLATLINE
Email; robnicoll(at)bigpond(dot)com
www.flatlinebows.com.au
www.flatlinebows.com.au
Re: Flatline opus 1&2
Hey Rob
Its funny but I was hoping you would say something about how you decide or what governs the shape of the handle. I reckon the handle can often make or break the bow when it comes to being comfortable and shooting consisantly. The knocking points you just covered so I can cross that off the Questions list.
Hazard
Politics is a game played by dishonest people to gain an unfair advantage!
Never under estimate the strength of a cornered coward.
Everyone is entitled to be stupid, but some abuse the privilege.
http://www.bowmanstaxidermy.com.au
Never under estimate the strength of a cornered coward.
Everyone is entitled to be stupid, but some abuse the privilege.
http://www.bowmanstaxidermy.com.au
Re: Flatline opus 1&2
Well Hazard, What I did when I first started was, I used my young fella's Korean take down as a model for basic shape and then griped the roughly shaped riser, determined where it felt like there was to much pressure against my hand and carefully sanded until there were no areas that didn't feel comfortable. Now after making a few I just know where to take it off and leave it on.
Oh yeah, I've got Pauls first limb in the oven, I'll do the other tomorrow,,,,See I'm on to it Paul .
Rob.
Oh yeah, I've got Pauls first limb in the oven, I'll do the other tomorrow,,,,See I'm on to it Paul
Rob.
The shortest distance between two points is a FLATLINE
Email; robnicoll(at)bigpond(dot)com
www.flatlinebows.com.au
www.flatlinebows.com.au
Re: Flatline opus 1&2
Thanks Rob,
Will you be covering what coatings you put on the bow?
Will you be covering what coatings you put on the bow?
Politics is a game played by dishonest people to gain an unfair advantage!
Never under estimate the strength of a cornered coward.
Everyone is entitled to be stupid, but some abuse the privilege.
http://www.bowmanstaxidermy.com.au
Never under estimate the strength of a cornered coward.
Everyone is entitled to be stupid, but some abuse the privilege.
http://www.bowmanstaxidermy.com.au
Re: Flatline opus 1&2
In a limited way Hazard, I'm not really a spray painter , still battling with it myself.
The shortest distance between two points is a FLATLINE
Email; robnicoll(at)bigpond(dot)com
www.flatlinebows.com.au
www.flatlinebows.com.au
Re: Flatline opus 1&2
You are a talented man. If I ever decide to make a glass bow I know I will have to pic your brain. I am just trying to get that selfbow done. Looking really good.
Re: Flatline opus 1&2
Have you got Paul on a chain so he doesn't run in and nick the first bow? If I was paul i am not sure I could wait that long even if it is half done! I'mpretty toey just reading this thread
So what's your pref tru oil?
Hazard
So what's your pref tru oil?
Hazard
Politics is a game played by dishonest people to gain an unfair advantage!
Never under estimate the strength of a cornered coward.
Everyone is entitled to be stupid, but some abuse the privilege.
http://www.bowmanstaxidermy.com.au
Never under estimate the strength of a cornered coward.
Everyone is entitled to be stupid, but some abuse the privilege.
http://www.bowmanstaxidermy.com.au
Re: Flatline opus 1&2
hay hazard
I live in kalgoorlie wa so i am a bit far away .
I cant wait mate . as i have had to wait for the timber to dry and for rob to start it . and yes i am super keen to get it . but i have to be patent so it is done right .
I live in kalgoorlie wa so i am a bit far away .
I cant wait mate . as i have had to wait for the timber to dry and for rob to start it . and yes i am super keen to get it . but i have to be patent so it is done right .
Re: Flatline opus 1&2
Hey Paul, Your limb blanks are on the riser, coming together very nicely, the first gloss coat is on Great storm,,,Wow,  and then I remembered I've run out of bow quiver inserts and they have to be put in before any more coats go on. So I've ordered them express from three rivers,,3-5 days, , not bad really. Not cheap either .
I'll have a bit of a rave about how I go about coating my bows but like I said I'm not a spray painter so it's just what I do.
First I sand all the timber surfaces with 220 grit until ALL of the machine marks are gone, then a coat of pressure pack satin. This is alowed to dry for two days and then sanded off, and I mean off, it's only used as a grain filler and should only remain in the pores not on the surface of the timber. Thats the last time I use sand paper, unless I get a run or something,,,native bees, dog hair,sideways rain, green frogs, elephant beatles etc in the coat. From here on I just use 000 grade steel wool to remove ALL of the gloss between coats, works really well on the curves.
I use a marine grade UV treated, gloss, polyurathane designed for hard wearing surfaces called "Weatherfast poly clear" made by "Norfast" for all of the build up coats, usually 3-4 and then finish it off with a coat of satin to take the shine off. (seems like such a shame some times ) It's applied using a small touch-up spray gun that holds up to 100 ml of product.
No pics,, thought I'd make ya's hangout to see the final product .
Cheers, Rob.
I'll have a bit of a rave about how I go about coating my bows but like I said I'm not a spray painter so it's just what I do.
First I sand all the timber surfaces with 220 grit until ALL of the machine marks are gone, then a coat of pressure pack satin. This is alowed to dry for two days and then sanded off, and I mean off, it's only used as a grain filler and should only remain in the pores not on the surface of the timber. Thats the last time I use sand paper, unless I get a run or something,,,native bees, dog hair,sideways rain, green frogs, elephant beatles etc in the coat. From here on I just use 000 grade steel wool to remove ALL of the gloss between coats, works really well on the curves.
I use a marine grade UV treated, gloss, polyurathane designed for hard wearing surfaces called "Weatherfast poly clear" made by "Norfast" for all of the build up coats, usually 3-4 and then finish it off with a coat of satin to take the shine off. (seems like such a shame some times
No pics,, thought I'd make ya's hangout to see the final product
Cheers, Rob.
The shortest distance between two points is a FLATLINE
Email; robnicoll(at)bigpond(dot)com
www.flatlinebows.com.au
www.flatlinebows.com.au
Re: Flatline opus 1&2
Now that is a rotten trick there but you got me. I will wait to see it. Are you done yet?
How about now? Now? or even now?
How about now? Now? or even now?
Re: Flatline opus 1&2
Foot is tapping with impatience. 

Re: Flatline opus 1&2
The villagers are gathering their pitchforks and torches, Rob!
Lately, if life were treating me any better, I'd be suspicious of it's motives!
Re: Flatline opus 1&2
Still waiting for the inserts.
Paul's bow weighed in at 63 # on the first weigh and should finish on 60 #.
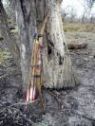
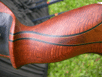
The top limb had a slight twist so I thought I'd post how it is fixed.
Here's the top limb, notice how the string sits slightly to the left of center of the limb. So what we want to do is get the knock tip to move to the right and stay there of it's own accord, taking the string to the right with it. Because the twist is so minimal it can be easily remedied by (IMO) correcting the imbalance in tensions/resistance within the timber lams. (Which is a complicated way of saying; twist it back the other way )
So with the tip of the bottom limb resting on my foot, I firmly hold the base of the top limb in one hand and the tip in the other and twist the tip in the direction I want it to go.
Give it a firm twist and then work the bow a few times and check how the string tracks. If it's good, then job done, if not then repeat the process but twist it a little harder. You don't have to be afraid of breaking the limb, I think you'd have to be pretty buffed to do any damage. Of course there are limits to how much limb twist you can correct in this manner, if the twist is to severe, then the knock tip must be physically moved in the required direction by filing the knock groove on the necessary side deeper and removing the same amount from the edge of the limb tip, (this is best done in very small increments.
Cheers, Rob.
Paul's bow weighed in at 63 # on the first weigh and should finish on 60 #.
The top limb had a slight twist so I thought I'd post how it is fixed.
Here's the top limb, notice how the string sits slightly to the left of center of the limb. So what we want to do is get the knock tip to move to the right and stay there of it's own accord, taking the string to the right with it. Because the twist is so minimal it can be easily remedied by (IMO) correcting the imbalance in tensions/resistance within the timber lams. (Which is a complicated way of saying; twist it back the other way
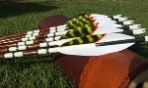
- SDC11399.JPG (59.68 KiB) Viewed 6178 times
- SDC11402.JPG (98.58 KiB) Viewed 6178 times
Cheers, Rob.
The shortest distance between two points is a FLATLINE
Email; robnicoll(at)bigpond(dot)com
www.flatlinebows.com.au
www.flatlinebows.com.au
Re: Flatline opus 1&2
Sorry Rob your shed looks a lot neater than mine! I dont see much dust! What would happen if the string tracked straight but the limb was a little bit off after the limb profile was cut?
Politics is a game played by dishonest people to gain an unfair advantage!
Never under estimate the strength of a cornered coward.
Everyone is entitled to be stupid, but some abuse the privilege.
http://www.bowmanstaxidermy.com.au
Never under estimate the strength of a cornered coward.
Everyone is entitled to be stupid, but some abuse the privilege.
http://www.bowmanstaxidermy.com.au
Re: Flatline opus 1&2
By the way, we havent forgotten Rob, we still want to see it all finished
Politics is a game played by dishonest people to gain an unfair advantage!
Never under estimate the strength of a cornered coward.
Everyone is entitled to be stupid, but some abuse the privilege.
http://www.bowmanstaxidermy.com.au
Never under estimate the strength of a cornered coward.
Everyone is entitled to be stupid, but some abuse the privilege.
http://www.bowmanstaxidermy.com.au
Re: Flatline opus 1&2
So do I Hazard. The inserts haven't turned up yet,,,3-5 days,,,yeah righthazard wrote:By the way, we havent forgotten Rob, we still want to see it all finished
I'd just gone through the shed with the blower before I took those photos,,,Don't want to give anyone the wrong impression
Rob.
The shortest distance between two points is a FLATLINE
Email; robnicoll(at)bigpond(dot)com
www.flatlinebows.com.au
www.flatlinebows.com.au
Re: Flatline opus 1&2
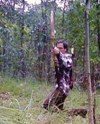
love those work shoes you got on there
Oh almost forgot is it done yet.
Oh almost forgot is it done yet.
Re: Flatline opus 1&2
Hey KellyG
You cant fault the good old Mt Druitt safety boots!
You cant fault the good old Mt Druitt safety boots!
KellyG wrote:love those work shoes you got on there
Politics is a game played by dishonest people to gain an unfair advantage!
Never under estimate the strength of a cornered coward.
Everyone is entitled to be stupid, but some abuse the privilege.
http://www.bowmanstaxidermy.com.au
Never under estimate the strength of a cornered coward.
Everyone is entitled to be stupid, but some abuse the privilege.
http://www.bowmanstaxidermy.com.au
Re: Flatline opus 1&2
Not quite sure what you mean by that Hazard, but as far as I know if your string doesn't track dead center of your limb, it's not right and will result in limb twist. Perhaps not immediately but IMO it will happen.hazard wrote: What would happen if the string tracked straight but the limb was a little bit off after the limb profile was cut?
Work? what work, I'm making a bow not working
Still no inserts
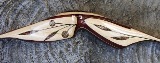
So now both bows are at the same stage and waiting for inserts. I thought Paul (and y'all) would like to see what his looked like. It's typical isn't it, Paul's leaf is perfectly in line
And here's a picture.
- SDC11410.JPG (82.47 KiB) Viewed 6062 times
- SDC11413.JPG (106.06 KiB) Viewed 6062 times
The shortest distance between two points is a FLATLINE
Email; robnicoll(at)bigpond(dot)com
www.flatlinebows.com.au
www.flatlinebows.com.au