Flatline opus 1&2

How to make a Bow, a String or a Set of Arrows. Making equipment & tools for use in Traditional Archery and Bowhunting.

Moderator: Moderators

Message
Author
User avatar
Flatliner
Posts: 449
Joined: Fri Apr 08, 2011 6:12 pm
Location: Gordonvale NTH QLD

Re: Flatline opus 1&2

#31 Post by Flatliner » Tue May 24, 2011 9:56 pm

Got the second leaf glued and clamped up.
Here's a pic of the first one out of the clamps so you can see the colors.
SDC11091.JPG
SDC11091.JPG (152.73 KiB) Viewed 5520 times
Then I went on to selecting the cuts out of the Conkerberry for the risers. To avoid waisting to much of this valuable timber I decided it was worth while cutting the riser shape out roughly and replacing the off-cuts with pine to form the block which is necessary for the process I use to form the limb planes. I wasn't able to save Jupiter's great storm though,which is a shame.
SDC11086.JPG
SDC11086.JPG (191.67 KiB) Viewed 5520 times
And ready to be glued and clamped.
SDC11089.JPG
SDC11089.JPG (153.27 KiB) Viewed 5520 times
It's in the clamps now. I'll see how it comes out in the morning.
Cheers, Rob.
Last edited by Flatliner on Tue Aug 02, 2011 4:56 pm, edited 1 time in total.
The shortest distance between two points is a FLATLINE
ImageEmail; robnicoll(at)bigpond(dot)com
www.flatlinebows.com.au

User avatar
bigbob
Posts: 4098
Joined: Sat Jul 10, 2010 8:55 pm
Location: sunshine coast

Re: Flatline opus 1&2

#32 Post by bigbob » Wed May 25, 2011 9:09 am

Is the leaf made from silky oak Rob?
nil illigitimo in desperandum carborundum
razorbows.com

User avatar
rodlonq
Posts: 2096
Joined: Wed May 06, 2009 3:02 pm
Location: Ingham NQ

Re: Flatline opus 1&2

#33 Post by rodlonq » Wed May 25, 2011 1:46 pm

Gidday Rob,

Thanks for posting the process of how you make the leaf inlay, that is great work mate and I have been quite preoccupied with trying to figure out how you do it.

Cheers....... Rod

User avatar
hazard
Posts: 1516
Joined: Sun Jan 16, 2011 5:45 pm
Location: Maraylya

Re: Flatline opus 1&2

#34 Post by hazard » Wed May 25, 2011 2:17 pm

Love it ....Great Stuff
Politics is a game played by dishonest people to gain an unfair advantage!

Never under estimate the strength of a cornered coward.

Everyone is entitled to be stupid, but some abuse the privilege.

http://www.bowmanstaxidermy.com.au
Image

User avatar
Dryfired
Posts: 85
Joined: Sat Mar 19, 2011 2:57 pm
Location: Brisbane

Re: Flatline opus 1&2

#35 Post by Dryfired » Wed May 25, 2011 6:14 pm

WOW Rob, that's beautiful timber! Thanks for sharing your work!

User avatar
Flatliner
Posts: 449
Joined: Fri Apr 08, 2011 6:12 pm
Location: Gordonvale NTH QLD

Re: Flatline opus 1&2

#36 Post by Flatliner » Wed May 25, 2011 8:14 pm

Thanks blokes. No Bob it's Beefwood, it's got the prominent ray paten like all the Oaks but it's hard and dense. It's called Beef wood cause if you cut it about 10 degree's off true quarter-cut it looks a bit like corned beef.

Here's a pic of the same side of the other bow with the piece I cut out due to faults, I was lucky to find a piece that almost matches the grain 8) :) .
SDC11098.JPG
SDC11098.JPG (184.01 KiB) Viewed 5488 times
You were right Jeff, I am having a hard time Getting what I nead out of what I've got :roll: :wink: .

Rob
The shortest distance between two points is a FLATLINE
ImageEmail; robnicoll(at)bigpond(dot)com
www.flatlinebows.com.au

User avatar
Stickbow Hunter
Supporter
Supporter
Posts: 11637
Joined: Sat Jul 26, 2003 8:33 pm
Location: Maryborough Queensland

Re: Flatline opus 1&2

#37 Post by Stickbow Hunter » Wed May 25, 2011 9:17 pm

Flatliner wrote:You were right Jeff, I am having a hard time Getting what I nead out of what I've got .
It would seem that way; what a job - gotta love it or ya wouldn't do it. :lol:

Jeff

User avatar
hazard
Posts: 1516
Joined: Sun Jan 16, 2011 5:45 pm
Location: Maraylya

Re: Flatline opus 1&2

#38 Post by hazard » Thu May 26, 2011 11:44 am

The more detail the better. I really enjoy watching the process and learning what goes into it.... and why. I have only made one bow so far, broke just about every rule I could find and for the short time it worked it did quite well until it failed. Anything I can learn will always help for my next attempt to offend the rule book.
Politics is a game played by dishonest people to gain an unfair advantage!

Never under estimate the strength of a cornered coward.

Everyone is entitled to be stupid, but some abuse the privilege.

http://www.bowmanstaxidermy.com.au
Image

User avatar
Flatliner
Posts: 449
Joined: Fri Apr 08, 2011 6:12 pm
Location: Gordonvale NTH QLD

Re: Flatline opus 1&2

#39 Post by Flatliner » Thu May 26, 2011 7:30 pm

You know what it's like Jeff, sometimes it's only the vision of the end result that keeps you going, but the journey is always interesting/fun/frustrating and ultimately satisfying. Yeah I love it.
Rules Hazard?,,,,,, I didn't know there were rules, one of the 'principles' I live by is, "get your self a good set of principles and you won't need to read the rules" More detail on the way, I haven't even started making the bows yet, this is all just to get the timber to build them out of. Ah the fun and games :) :roll: :lol: .

Cheers, Rob.
The shortest distance between two points is a FLATLINE
ImageEmail; robnicoll(at)bigpond(dot)com
www.flatlinebows.com.au

slvrslngr
Posts: 199
Joined: Sun Nov 08, 2009 10:47 am
Location: SoCal

Re: Flatline opus 1&2

#40 Post by slvrslngr » Thu May 26, 2011 9:44 pm

Too cool Rob! That's some beautiful wood and some fine craftsmanship to bring out the best of it. Can't wait to see the finished products! Hope to be talking to you soon!

Chris

User avatar
Flatliner
Posts: 449
Joined: Fri Apr 08, 2011 6:12 pm
Location: Gordonvale NTH QLD

Re: Flatline opus 1&2

#41 Post by Flatliner » Fri May 27, 2011 5:56 pm

Thanks Chris, Paul told me you had set a date to meet up, have a great trip and say Gday for me.

Cheers, Rob.
The shortest distance between two points is a FLATLINE
ImageEmail; robnicoll(at)bigpond(dot)com
www.flatlinebows.com.au

slvrslngr
Posts: 199
Joined: Sun Nov 08, 2009 10:47 am
Location: SoCal

Re: Flatline opus 1&2

#42 Post by slvrslngr » Fri May 27, 2011 7:55 pm

Hoping to get out there in a couple weeks. Looking forward to a roadtrip, even better when it involves flinging arrows!

User avatar
Flatliner
Posts: 449
Joined: Fri Apr 08, 2011 6:12 pm
Location: Gordonvale NTH QLD

Re: Flatline opus 1&2

#43 Post by Flatliner » Sat May 28, 2011 7:58 pm

Well after a lengthy session on the band-saw and lam grinder, all the components for both risers are ready to be clamped into blocks. Discovered the false Sandal wood is an absolute bugger to sand, only get 100 mm into a grind and the belt is already starting to clog. Ended up pulling the lam through the grinder with one hand and clearing the belt using a file card with the other hand. :roll:
I've gone a little over the top with the veneer layers, but I think the combo will look the goods.
So the layers are from the top down; Conkerberry,Beefwood, Silver Ash, Fls Sandal wood, Slv Ash, Fls Sandal wood, Slv Ash, Beefwood Conkerberry.

And here's a picture of all the parts for both risers layed out in the order they will be in the block.
The veneers are about 0.020" or 0.5 mm thick. I've found the thiner you make details like this, the classier it looks. The finished size of the blocks will be 500mm long x 90mmx45mm exactly.
SDC11105.JPG
SDC11105.JPG (176.95 KiB) Viewed 5423 times
So I've got one in the clamps now and I'll glue the other one in the morning.

Cheers, Rob.
Attachments
SDC11101.JPG
SDC11101.JPG (172.52 KiB) Viewed 5423 times
Last edited by Flatliner on Tue Aug 02, 2011 5:00 pm, edited 4 times in total.
The shortest distance between two points is a FLATLINE
ImageEmail; robnicoll(at)bigpond(dot)com
www.flatlinebows.com.au

User avatar
muntries
Posts: 296
Joined: Tue Nov 17, 2009 9:10 am
Location: Ballarat

Re: Flatline opus 1&2

#44 Post by muntries » Sun May 29, 2011 3:57 pm

Maybe a dumb question from a non bow maker, but will you be using glass in the limbs or just rely on the limb veneers?
"With staff in hand, the hunter stood on Radholme's dewy lawn" The Hunters Song (Olde Lancashire Poem) by Richard Parkinson.

User avatar
Stickbow Hunter
Supporter
Supporter
Posts: 11637
Joined: Sat Jul 26, 2003 8:33 pm
Location: Maryborough Queensland

Re: Flatline opus 1&2

#45 Post by Stickbow Hunter » Sun May 29, 2011 6:29 pm

There should be some contrast with those woods. :D

Jeff

User avatar
Flatliner
Posts: 449
Joined: Fri Apr 08, 2011 6:12 pm
Location: Gordonvale NTH QLD

Re: Flatline opus 1&2

#46 Post by Flatliner » Sun May 29, 2011 6:36 pm

I'll definitely be using glass on the limbs Simon, 40 thou on the back and 50 thou on the belly.
Seeing as how these bows are a bit special I decided to go the whole hog and put a mosaic made from a combo of all the timbers in the bows sandwiched between clear glass through the risers as well. I just love making work for my self don't I :) . Ah well if ya gona do it, do it well.
Here's a pic of the bits of wood, they are about 8mm x 10mm, I'll cut them to 45mm long and glue them cross wise between two bits of 40 thou glass, when it's dry I'll rip it down the middle on the band saw so I'll have two pieces of glass with an approximately 2.5mm layer of mosaic wood on one side. Oh yeah I'm gona add some Silver Ash in too.
SDC11108.JPG
SDC11108.JPG (183.55 KiB) Viewed 5394 times

Yeah Jeff, they'll look like I got them from the lolly shop :lol: .

Ah! bummer my cars fixed, now I'll have to go back to work, what a drag I was just starting to get into bow making mode. :cry: :|

Rob.
Last edited by Flatliner on Sun May 29, 2011 9:10 pm, edited 2 times in total.
The shortest distance between two points is a FLATLINE
ImageEmail; robnicoll(at)bigpond(dot)com
www.flatlinebows.com.au

User avatar
rodlonq
Posts: 2096
Joined: Wed May 06, 2009 3:02 pm
Location: Ingham NQ

Re: Flatline opus 1&2

#47 Post by rodlonq » Sun May 29, 2011 6:58 pm

I like lollies..... a lot :lol:

Cheers....... Rod

User avatar
Flatliner
Posts: 449
Joined: Fri Apr 08, 2011 6:12 pm
Location: Gordonvale NTH QLD

Re: Flatline opus 1&2

#48 Post by Flatliner » Mon May 30, 2011 9:41 pm

Had a short day at work so did a bit more this afternoon.
I ran both riser blocks through the grinder to clean them up then marked out the piece to be cut out for the mosaic. Normally I would just make one cut, but this time I'm going to remove a 4mm strip so I don't put my leaves (which are buried in the middle and wont be seen again until the sight windows are cut out) out of shape.
SDC11113.JPG
SDC11113.JPG (192.96 KiB) Viewed 5390 times
Then I milled down a bit of Silver Ash to add to the mosaic and cut them all into 45mm blocks and cut the glass for all the limbs and masked the ones for the mosaic.
SDC11112.JPG
SDC11112.JPG (95.51 KiB) Viewed 5390 times
Pretty isn't it :) 8)


Then organized some specialized clamping blocks that fit my riser block gluing jig.
Here's what the dry run looks like.
SDC11115.JPG
SDC11115.JPG (187.89 KiB) Viewed 5390 times
This will be ripped in half down the center of the wood and become the mosaic in both bows.

I've glued up the mosaic (wasn't that fun :!: ....not :| ) but it's in the clamps now ya!!

Cheers, Rob.
The shortest distance between two points is a FLATLINE
ImageEmail; robnicoll(at)bigpond(dot)com
www.flatlinebows.com.au

User avatar
rodlonq
Posts: 2096
Joined: Wed May 06, 2009 3:02 pm
Location: Ingham NQ

Re: Flatline opus 1&2

#49 Post by rodlonq » Mon May 30, 2011 11:34 pm

Thats a neat bit of work Rob, enjoying your posts immensly.

Cheers, Rod

User avatar
Stickbow Hunter
Supporter
Supporter
Posts: 11637
Joined: Sat Jul 26, 2003 8:33 pm
Location: Maryborough Queensland

Re: Flatline opus 1&2

#50 Post by Stickbow Hunter » Tue May 31, 2011 8:39 am

Enjoying the journey Rob!

Jeff

User avatar
bigbob
Posts: 4098
Joined: Sat Jul 10, 2010 8:55 pm
Location: sunshine coast

Re: Flatline opus 1&2

#51 Post by bigbob » Tue May 31, 2011 9:38 am

The effort you're putting in reminds me of the guy who got a job picking fly s##@t out of the pepper.Man you are a glutton for punishment, but cant wait to see the finished deal!
nil illigitimo in desperandum carborundum
razorbows.com

User avatar
hazard
Posts: 1516
Joined: Sun Jan 16, 2011 5:45 pm
Location: Maraylya

Re: Flatline opus 1&2

#52 Post by hazard » Tue May 31, 2011 5:00 pm

bigbob wrote:The effort you're putting in reminds me of the guy who got a job picking fly s##@t out of the pepper.Man you are a glutton for punishment, but cant wait to see the finished deal!

Yep Bigbob summed it up but man leonardo da vinci will be hard pressed to keep up
Politics is a game played by dishonest people to gain an unfair advantage!

Never under estimate the strength of a cornered coward.

Everyone is entitled to be stupid, but some abuse the privilege.

http://www.bowmanstaxidermy.com.au
Image

User avatar
Flatliner
Posts: 449
Joined: Fri Apr 08, 2011 6:12 pm
Location: Gordonvale NTH QLD

Re: Flatline opus 1&2

#53 Post by Flatliner » Wed Jun 01, 2011 7:52 pm

OK, so I got the mosaic out of the clamps and cleaned it up on what I call my sanding deck, which is a 250 wide sanding belt from a floor sander cut so it is a sheet about 1 M long and clamped down to the very flat section of bench I dressed for this purpose. I use this setup quite a bit during the whole process, it's a very useful tool. I use grades of paper from 24 grit through to 180 grit.
Then I ripped the mosaic on the band saw and ground them down to the desired thickness removed the masking tape from the glass (which is 40 thou) side and sanded it on the lam grinder, all with 40 grit paper.
SDC11117.JPG
SDC11117.JPG (125.12 KiB) Viewed 5349 times
I sanded both sides of the 50 thou glass until it was 40 thou to match the other one and set them aside.
I then cut the strips out of the risers very carefully on the band saw.
SDC11120.JPG
SDC11120.JPG (186.9 KiB) Viewed 5349 times
Using radiused blocks with 24 grit paper glued to them and back-light to see where material needed to be removed, I carefully matched them. I find doing this process by hand is by far the most efficient method, if you do it on a machine one slip or bump means you have to take the whole surface back to match the mistake.
SDC11124.JPG
SDC11124.JPG (169.36 KiB) Viewed 5339 times
Notice how the sanding blocks aren't as wide as the riser block but the paper is, this is to counter the camber that naturally develops when your sanding block is as wide or wider than what you are sanding.
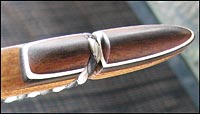
So after about 10 minutes of sanding the join should look like this :D .
SDC11125.JPG
SDC11125.JPG (93.75 KiB) Viewed 5339 times
I glued up both riser blocks making sure when I put the mosaic strip in, that the wood was in compression and the glass in tension (I've tried to do it the other way and had the little blocks split :x :oops: not good in the middle of a lay-up.
And here's a picture :) .
SDC11128.JPG
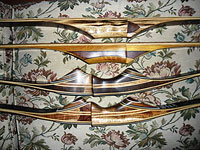
SDC11128.JPG (174.5 KiB) Viewed 5339 times
Can't really see the colours in the mosaic yet cause it's rough sanded.
It's all about delayed gratification :wink:

Cheers, Rob.
Last edited by Flatliner on Thu Jun 16, 2011 8:35 pm, edited 3 times in total.
The shortest distance between two points is a FLATLINE
ImageEmail; robnicoll(at)bigpond(dot)com
www.flatlinebows.com.au

KellyG
Posts: 194
Joined: Tue Nov 09, 2010 5:53 am
Location: Riley, Kansas, USA

Re: Flatline opus 1&2

#54 Post by KellyG » Wed Jun 01, 2011 8:03 pm

That is going to be a pair of beauties once your done.

User avatar
hazard
Posts: 1516
Joined: Sun Jan 16, 2011 5:45 pm
Location: Maraylya

Re: Flatline opus 1&2

#55 Post by hazard » Wed Jun 01, 2011 8:16 pm

Rob
You must have a great choice of machines and fixtures to do all this and the degree of labour I think I am only just now coming to grips with great work keep up the posts this is fantastic.
Politics is a game played by dishonest people to gain an unfair advantage!

Never under estimate the strength of a cornered coward.

Everyone is entitled to be stupid, but some abuse the privilege.

http://www.bowmanstaxidermy.com.au
Image

User avatar
Flatliner
Posts: 449
Joined: Fri Apr 08, 2011 6:12 pm
Location: Gordonvale NTH QLD

Re: Flatline opus 1&2

#56 Post by Flatliner » Wed Jun 01, 2011 9:05 pm

They'll be priceless kellyG cause they will never be for sale, unless you want to start the biding :lol: :lol: .
Hey Hazard :lol: :lol: I should take a couple of pics of my little shed I think it would surprise you how little you really need to make some really nice stuff. Ninety percent of the machine work is done on the band saw and lam grinder/spindle-sander. My lamb grinder is really simple, it's the running gear out of a 610 x100 Makita belt sander mounted horizontaly above a flat timber work surface. Apart from that the only other powered tools I use are a small drill press (for about five minutes per bow) router, jig saw, compressor and batery drill.
I'll post this and go take a photo of my lam grinder.
SDC11129.JPG
SDC11129.JPG (194.81 KiB) Viewed 5334 times
I use a timber block for a fence so when I change a belt (which takes about 30 seconds :) ) I just run the block over the new face and walah ,, perfectly paralell fence.
The simple things in life ARE the best

The home of Flatline Bows
SDC11131.JPG
SDC11131.JPG (178.28 KiB) Viewed 5334 times
Cossy hey :)
See that shinny stuff on the bench,,, thats the third coat of left over techniglue :lol: :lol:.

You see what I mean Rod?,,,, How's the saw dust going to get into your blood if there's none around :P :lol: .
Rob
Last edited by Flatliner on Sun Jun 12, 2011 12:38 am, edited 7 times in total.
The shortest distance between two points is a FLATLINE
ImageEmail; robnicoll(at)bigpond(dot)com
www.flatlinebows.com.au

slvrslngr
Posts: 199
Joined: Sun Nov 08, 2009 10:47 am
Location: SoCal

Re: Flatline opus 1&2

#57 Post by slvrslngr » Wed Jun 01, 2011 9:29 pm

Man this is cool! Love seeing how all this is done!

User avatar
UPTHETOP
Posts: 1187
Joined: Mon Jun 11, 2007 9:03 pm
Location: Dalby
Contact:

Re: Flatline opus 1&2

#58 Post by UPTHETOP » Wed Jun 01, 2011 9:48 pm

Rob a ton of work mate, but the bow will last a lifetime.

Cheers Wayno
Justastik Arrow Craft, Its all about the Wood.

User avatar
blu-dog
Posts: 718
Joined: Thu Sep 18, 2008 9:04 pm
Location: Bundaberg

Re: Flatline opus 1&2

#59 Post by blu-dog » Wed Jun 01, 2011 9:49 pm

This is really amazing to watch...I love watching the character of a bow develop as the craftsman shapes and defines it!


Rob - thanks for taking the time to share this with us!
The best trophies I can hope to acquire as a husband, father, friend or hunter are MEMORIES!
They will travel with me wherever life's path leads...

User avatar
Flatliner
Posts: 449
Joined: Fri Apr 08, 2011 6:12 pm
Location: Gordonvale NTH QLD

Re: Flatline opus 1&2

#60 Post by Flatliner » Wed Jun 01, 2011 10:05 pm

Hi Wayno, thats one of the reasons I put the effort in I'm making some thing that with the right care will last a life time, perhaps more, so for the extra few hours or days :roll:it's worth it and it's no good six months or a year down the track thinking I wish I had done this or that. This is the time. The time is now.
Thanks guys for the words of encouragement.
Rob
The shortest distance between two points is a FLATLINE
ImageEmail; robnicoll(at)bigpond(dot)com
www.flatlinebows.com.au

Post Reply