Flatline opus 1&2

How to make a Bow, a String or a Set of Arrows. Making equipment & tools for use in Traditional Archery and Bowhunting.

Moderator: Moderators

Post Reply
Message
Author
User avatar
Flatliner
Posts: 449
Joined: Fri Apr 08, 2011 6:12 pm
Location: Gordonvale NTH QLD

Flatline opus 1&2

#1 Post by Flatliner » Wed May 04, 2011 9:35 pm

About 18 months ago me mate Paul Mayall (the knife maker) and I were siting around drooling over some Conkerberry samples he had brought back from down Charters towers way and fantasizing about a bow made completely from this outstandingly beautiful timber.
I said 'Paul if we can find pieces long enough for the limbs I can make the bow'. So we planed a timber hunting trip. We spent 4 days searching the 8 square KM of land that was due to be cleared by the station owner (you are not allowed to cut this timber with out a permit) for all the useable Conkerberry we could find.
Now after milling the best lengths and seasoning them for the last 16 months I'm going to start this opus like project.

I'll be making 2 take-down MC2s (one for Paul and one for me) using a combonation of false Sandal wood and Conkerberry in the risers and all Conkerberry limbs.
Target weights are around 52-55# @ 28" for me and around 58-60# @ 28" for Paul. I have a 29'' draw and Paul has a 27" draw so in the end we will be drawing about the same weight.

I havn't used Conkerberry for limbs before (due to this I'll be starting with the lighter set of limbs and using core thickness figers on the heavy side so if they come out heavy they can be Pauls limbs) but it passes all of my gluing,bending and stress tests so far, now to try it in action in a bow.
I thought maybe you all might like to follow the progress and see how it's done in the Flatline shed.
This project could take quite a while cause I'm fairly busy at work and I'll be doing it between that and other bow orders.
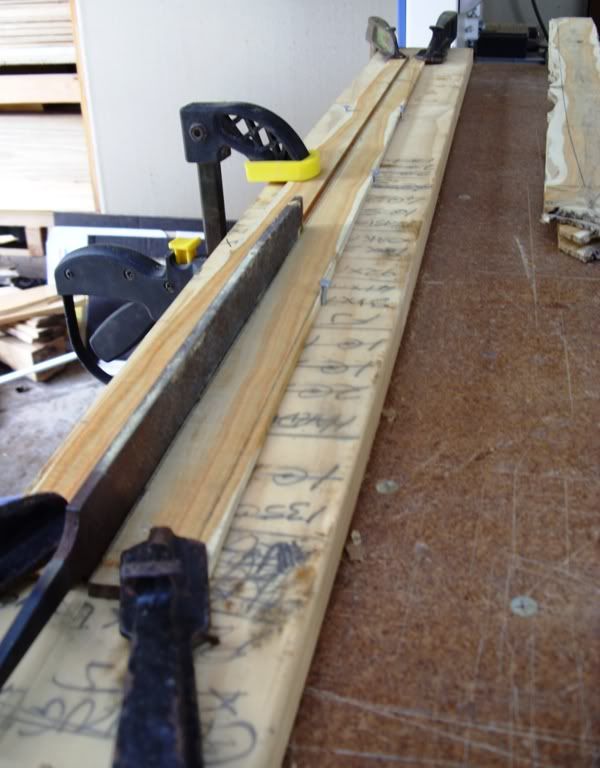
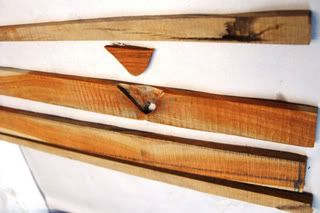
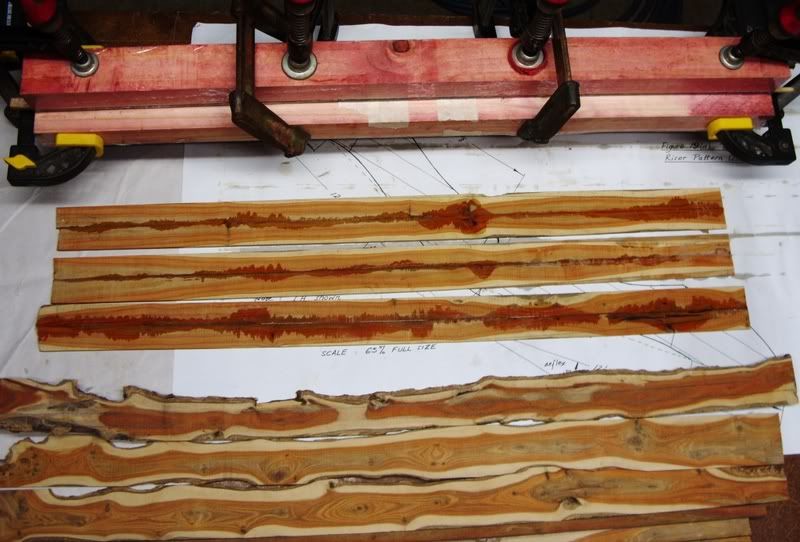
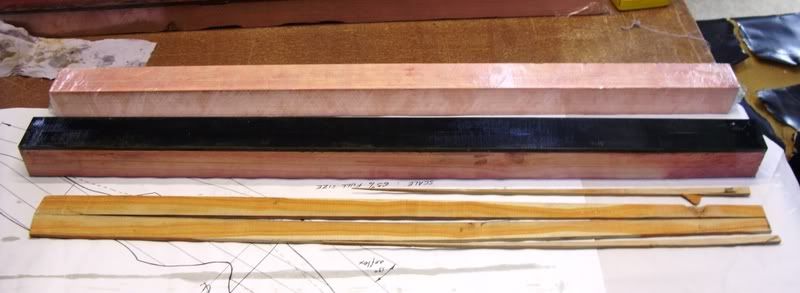
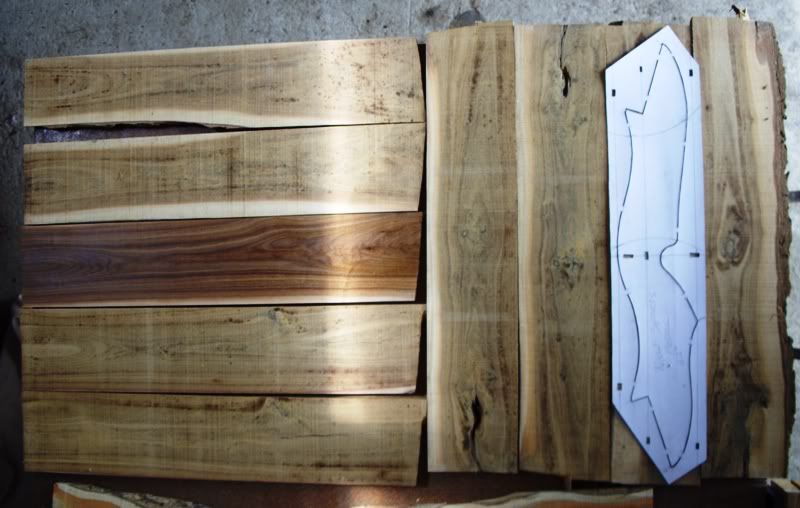
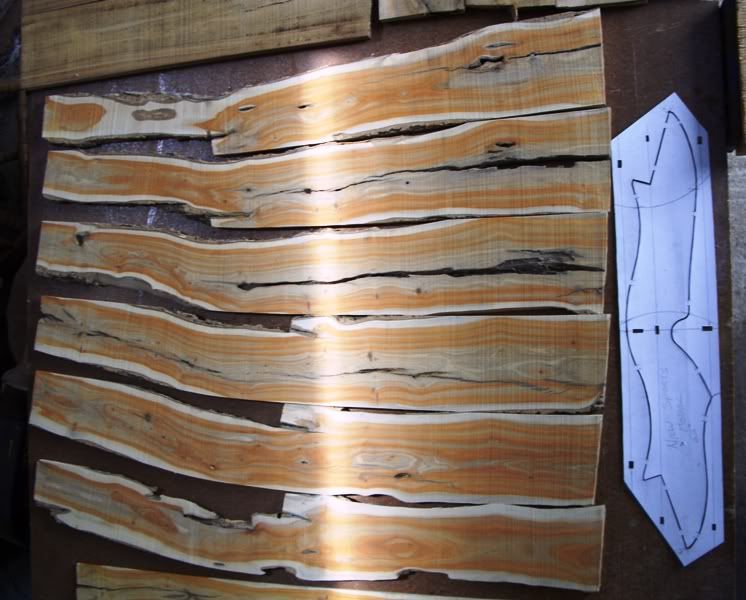
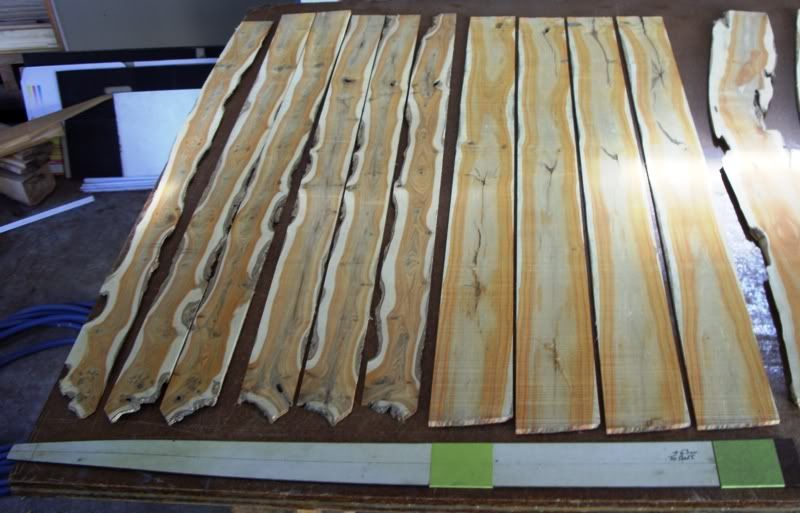
Here's some pics of the timber I'll be starting with.

Image

Image

Image
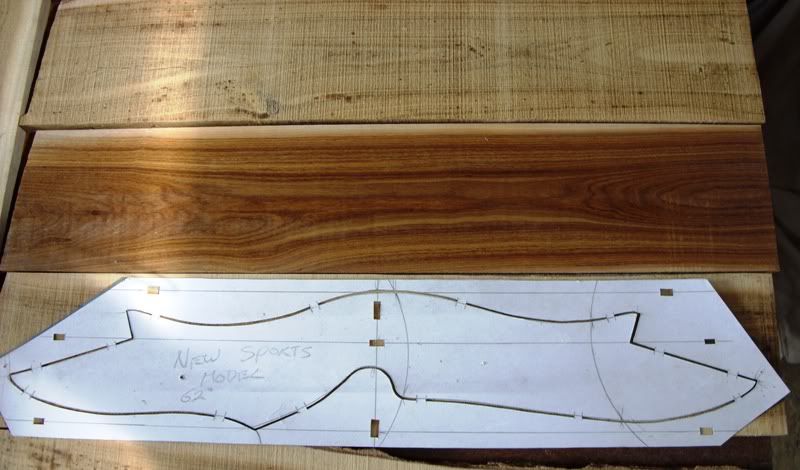
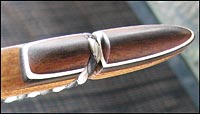
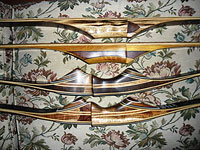
(above) The riser material. I've sanded and coated a piece of the false Sandal wood so you can see what it will look like finished. At the moment the riser timber is about 14mm thick, 100mm wide and 530mm long.

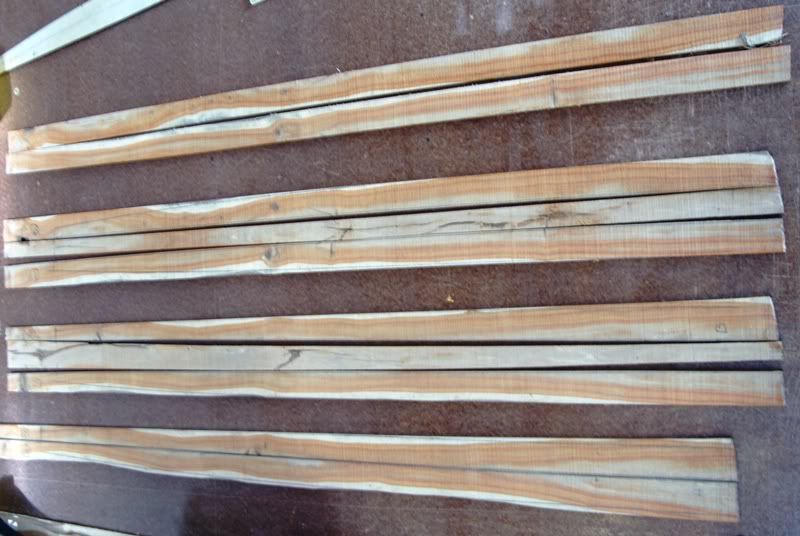
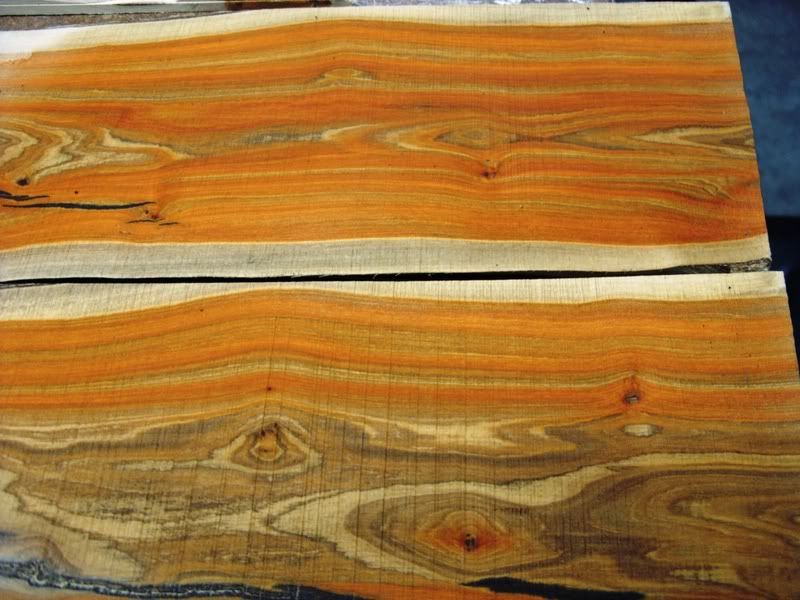
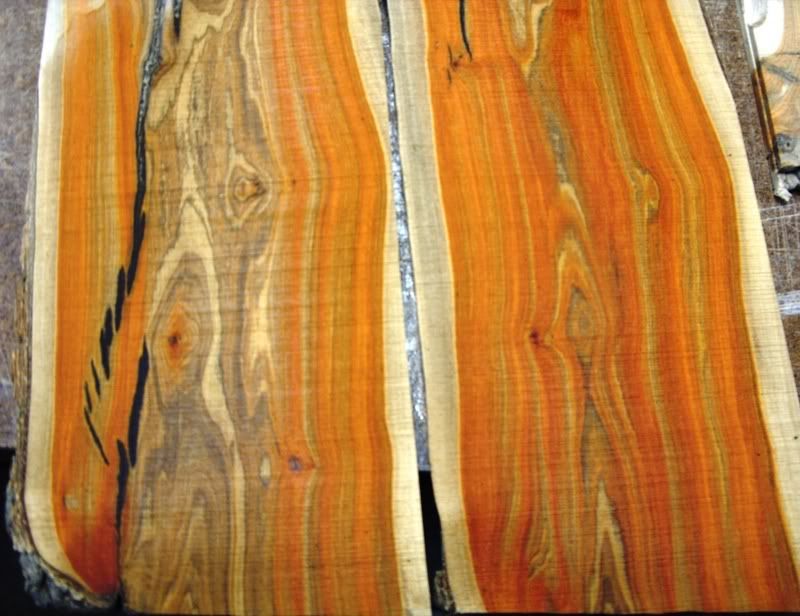
(below) The limb material. I will have to splice and relaminate some of this to get fault free solid lams.
Image

Image

Image
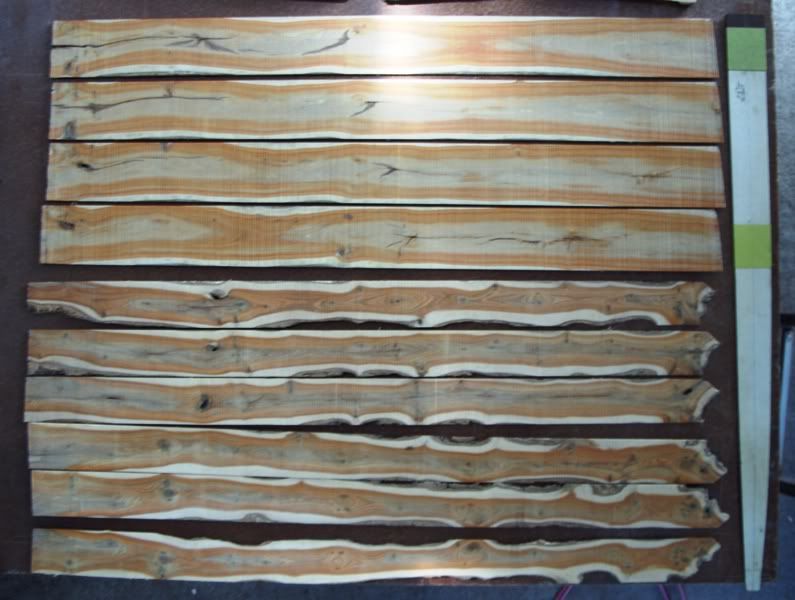
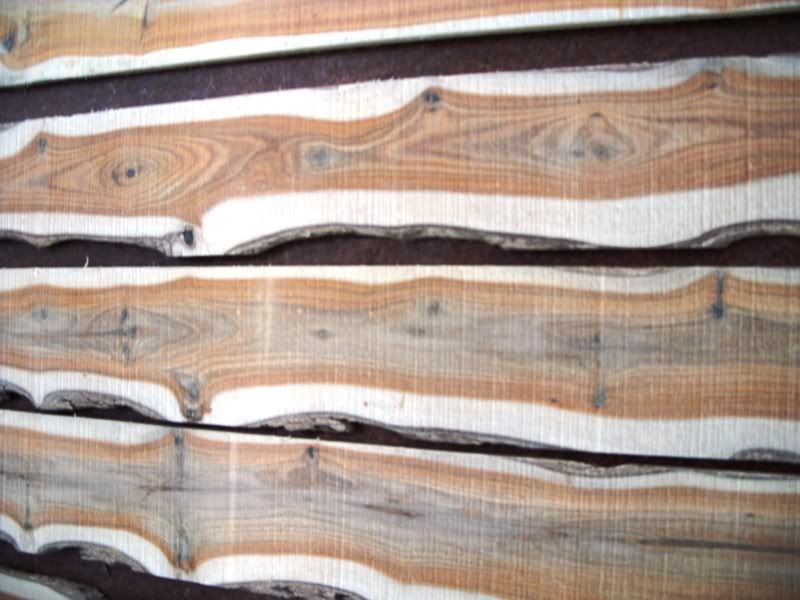
As you can see it's hard to get large fault free bits of Conkerberry, this is the best, straightest and longest of the almost full trailer load we were lucky enough to harvest.

Whish me luck.
Rob
Last edited by Flatliner on Tue Aug 02, 2011 4:35 pm, edited 2 times in total.
The shortest distance between two points is a FLATLINE
ImageEmail; robnicoll(at)bigpond(dot)com
www.flatlinebows.com.au

User avatar
rodlonq
Posts: 2096
Joined: Wed May 06, 2009 3:02 pm
Location: Ingham NQ

Re: Flatline opus 1&2

#2 Post by rodlonq » Thu May 05, 2011 8:04 am

Good luck Rob, looking forward to seeing more.

Cheers...... Rod

User avatar
Stickbow Hunter
Supporter
Supporter
Posts: 11637
Joined: Sat Jul 26, 2003 8:33 pm
Location: Maryborough Queensland

Re: Flatline opus 1&2

#3 Post by Stickbow Hunter » Thu May 05, 2011 9:28 am

I am looking forward to this Rob. It looks like you will have some work ahead of you getting usable pieces from those slabs. It certainly is nice looking wood though.

Jeff

User avatar
bigbob
Posts: 4098
Joined: Sat Jul 10, 2010 8:55 pm
Location: sunshine coast

Re: Flatline opus 1&2

#4 Post by bigbob » Thu May 05, 2011 11:30 am

Hi Rob. Interesting to see you mention Charters Towers.It was my old stomping grounds.Dont know the timber you mention, but my cousin had a block there and showed me some timber off that block. It was beautifully figured but more twisted than a dogs hind leg.Got no memory of the timbers name but sure looked good.
nil illigitimo in desperandum carborundum
razorbows.com

User avatar
Gringa Bows
Posts: 6331
Joined: Thu Aug 30, 2007 7:09 pm
Location: Bundaberg QLD

Re: Flatline opus 1&2

#5 Post by Gringa Bows » Thu May 05, 2011 1:00 pm

That is very nice timber alright.............

User avatar
Flatliner
Posts: 449
Joined: Fri Apr 08, 2011 6:12 pm
Location: Gordonvale NTH QLD

Re: Flatline opus 1&2

#6 Post by Flatliner » Sun May 08, 2011 8:42 pm

AAAHHH!! what have I started. I spent a few hrs in the shed this morning, thought I'd start with the easiest part :lol: :oops:, the belly lams for both bows.
Using my limb profile stencil I selected the best cuts for feature and strength out of the material I have to work with. After cutting out the grey core, my selection developed some not so nice curves.
Image

So I chose matching pairs, jigged and clamped them straight and ran a file between them to hopefully get a seamless join.
Image

I will have to add pieces of off-cut to the out side edges of three out of four of the lams to bring them back to 45mm wide.
I'm also trying to keep a bit of that white sap wood on the edges of the limbs as a border, it's got that orange/white Nemo type contrast going on. It also seems to have similar density and resilience characteristics.
So after 3 hrs this is what I've got, the second one down shows the outside edge add on bits (which will be re moved again when the limb shape is cut from the blank out of the form) and is also the only one that is ready to glue together, the method of which I'm still theorizing about.
Image

Just think all this is just to get blanks to grind half of the required lams out of.

I've got an interesting theory about what Patience is if anyone wants to hear it :? 8) :lol: but I think this project is going to test it to it's limits.

Cheers, Rob.
Last edited by Flatliner on Sun Jun 12, 2011 9:45 pm, edited 1 time in total.
The shortest distance between two points is a FLATLINE
ImageEmail; robnicoll(at)bigpond(dot)com
www.flatlinebows.com.au

User avatar
Jeffro
Posts: 1157
Joined: Mon Oct 31, 2005 3:33 pm
Location: sydneyMWFA,NewcastleHVTA

Re: Flatline opus 1&2

#7 Post by Jeffro » Mon May 09, 2011 6:20 pm

Looks good Rob.Ill be keeping an eye on this post aswell

User avatar
Stickbow Hunter
Supporter
Supporter
Posts: 11637
Joined: Sat Jul 26, 2003 8:33 pm
Location: Maryborough Queensland

Re: Flatline opus 1&2

#8 Post by Stickbow Hunter » Mon May 09, 2011 6:34 pm

That is a lot of work for sure.

Jeff

User avatar
hazard
Posts: 1516
Joined: Sun Jan 16, 2011 5:45 pm
Location: Maraylya

Re: Flatline opus 1&2

#9 Post by hazard » Mon May 09, 2011 6:53 pm

I have a quiet confidence with your experience and what I have seen of your bows this is going to be quite entertaining reading. I will be watching this thread closely ......very interesting.
Politics is a game played by dishonest people to gain an unfair advantage!

Never under estimate the strength of a cornered coward.

Everyone is entitled to be stupid, but some abuse the privilege.

http://www.bowmanstaxidermy.com.au
Image

User avatar
Flatliner
Posts: 449
Joined: Fri Apr 08, 2011 6:12 pm
Location: Gordonvale NTH QLD

Re: Flatline opus 1&2

#10 Post by Flatliner » Mon May 09, 2011 9:45 pm

Thanks for the vote of confidence Hazard, it may not happen over night but it will happen :lol: I think it's going to be interesting for me too :roll: I see lessons ahead.

This is what I'll be Telling my self (like a mantra) in those difficult moments.
(I ALWAYS start by telling....no convincing my self, this is going to be way way harder than I think it is).
Then I try to keep this in my head.
This doesn't require patience, patience is waiting in a line where it doesn't mater how long you wait the result will be the same. When you create something the more effort, care and time you put in the better the result is. So if you find your self taking longer, having to take more care and putting in more effort than you were expecting to, then there's a good chance the result will be better than you expected also.

Aim for the stars......you might hit the moon :wink: .
The shortest distance between two points is a FLATLINE
ImageEmail; robnicoll(at)bigpond(dot)com
www.flatlinebows.com.au

User avatar
muntries
Posts: 296
Joined: Tue Nov 17, 2009 9:10 am
Location: Ballarat

Re: Flatline opus 1&2

#11 Post by muntries » Tue May 10, 2011 6:49 am

Damn that is one nice looking timber! She'll be a stunner, thats for sure.

Simon
"With staff in hand, the hunter stood on Radholme's dewy lawn" The Hunters Song (Olde Lancashire Poem) by Richard Parkinson.

User avatar
Flatliner
Posts: 449
Joined: Fri Apr 08, 2011 6:12 pm
Location: Gordonvale NTH QLD

Re: Flatline opus 1&2

#12 Post by Flatliner » Tue May 17, 2011 8:26 pm

I've made a bit more progress over the last few days because my car blew a head gasket on the way home from work on Friday, so I've been ducking out to the shed every now and then to get a break from the quoting and book work I keep trying to avoid and no longer have an excuse to, cause I can't get to work till the car's fixed.
I've managed to get three lam blanks glued up and one in the clamps at the moment.So far so good, though I'm starting to feel more like a dental technician instead of a bowyer. had to fix a fault (an unavoidable bark inclusion).
Image

The finished lam blanks and one still in clamps.
Image

I glued some neoprene on to one each of my clamp blocks to maintain even pressure where there was a discrepancy in thickness or width.
Image

I was showing the Conkerberry to a friend and swabbed it down with metho to bring out the grain and WOW it even surprised me and I've been using this timber for a while now. My friend's comment was "it looks like the surface of Jupiter", not far wrong I reckon.
And here's a picture to drool over :shock: :lol:
Image

Image
Can't seem to get those first two photos any smaller, I've downsized them to 320 x 213 and they don't change in size on the thread :? . Any suggestions?

Cheers, Rob
Last edited by Flatliner on Tue Aug 02, 2011 4:41 pm, edited 1 time in total.
The shortest distance between two points is a FLATLINE
ImageEmail; robnicoll(at)bigpond(dot)com
www.flatlinebows.com.au

User avatar
Stickbow Hunter
Supporter
Supporter
Posts: 11637
Joined: Sat Jul 26, 2003 8:33 pm
Location: Maryborough Queensland

Re: Flatline opus 1&2

#13 Post by Stickbow Hunter » Tue May 17, 2011 9:52 pm

That sure is a huge amout of work to get a few lams. :shock: A very pretty wood though.

Are you able to downsize your photos and upload them straight from your computer? I ask this as there is going to be a lot of photos in this build -a-long and it won't mean much without them. If you EVER take them off photobucket they will be gone. :( If you upload them from your computer they are always going to be here for eveyone to enjoy. :D

Jeff

User avatar
bigbob
Posts: 4098
Joined: Sat Jul 10, 2010 8:55 pm
Location: sunshine coast

Re: Flatline opus 1&2

#14 Post by bigbob » Wed May 18, 2011 9:44 am

Beautifull looking timber, and a massive work load to get your requirements . I just remembered the name of that timber my cousin showed me from around the Towers. It was called dead finnish or finish. It looked great but was from very gnarly limbs.
nil illigitimo in desperandum carborundum
razorbows.com

User avatar
Flatliner
Posts: 449
Joined: Fri Apr 08, 2011 6:12 pm
Location: Gordonvale NTH QLD

Re: Flatline opus 1&2

#15 Post by Flatliner » Wed May 18, 2011 10:59 am

Yeah it's a lot of work but I think it will be worth it in the end. I didn't know about the photobucket thing Jeff, thanks for the heads up, I'll upload them straight from the computer in future.
Ah yes Bob, it's actual full name is Western dead finish and has pinkish and red tones from memory, very attractive timber but as you say hard to find a good sized straight piece like a lot of the timbers from that area. Speaking of which, I've decided to put a little Beefwood into the mix on these bows, that way I'll have a bit of all the timbers we collected on our timber hunting trip (then they will be kind of 'story bows', if you know what I mean).
I've also decided to grind the Conkerberry down as thin as I can and use it as veneers over a Bamboo core. I have faith in the timber but not in the faults in it. This way I'll have more confidence they will hold together in the long term. It would be a shame to put this much effort in to have the bows fail down the track aways.
I ran them through the lam grinder to clean them up, you got to be happy with joins like that hey :D .
SDC11064.JPG
SDC11064.JPG (123.52 KiB) Viewed 7781 times
Now to start on the difficult set of lams :roll: .

Rob.
Last edited by Flatliner on Tue Aug 02, 2011 4:43 pm, edited 3 times in total.
The shortest distance between two points is a FLATLINE
ImageEmail; robnicoll(at)bigpond(dot)com
www.flatlinebows.com.au

User avatar
bigbob
Posts: 4098
Joined: Sat Jul 10, 2010 8:55 pm
Location: sunshine coast

Re: Flatline opus 1&2

#16 Post by bigbob » Wed May 18, 2011 7:11 pm

Should make a spectacular looker, for all the hard work.
nil illigitimo in desperandum carborundum
razorbows.com

User avatar
Stickbow Hunter
Supporter
Supporter
Posts: 11637
Joined: Sat Jul 26, 2003 8:33 pm
Location: Maryborough Queensland

Re: Flatline opus 1&2

#17 Post by Stickbow Hunter » Wed May 18, 2011 7:38 pm

They come up looking very nice.

Jeff

User avatar
Nephew
Posts: 3046
Joined: Thu Aug 23, 2007 1:28 pm
Location: Coochiemudlo Island,Moreton Bay, Qld.

Re: Flatline opus 1&2

#18 Post by Nephew » Wed May 18, 2011 8:06 pm

It DOES look like the Great Storm in the clouds of Jupiter! I'd say the surface, but Jupiter has no surface, it's a gas giant. Nevertheless, that is going to make a magical looking bow. I can't wait to see the finished product. Flatline bows are beginning to replace Huntsman bows in my "most desired" category. :D
Lately, if life were treating me any better, I'd be suspicious of it's motives!

User avatar
kimall
Posts: 1426
Joined: Tue Jun 08, 2004 9:21 pm
Location: Toowoomba

Re: Flatline opus 1&2

#19 Post by kimall » Wed May 18, 2011 8:22 pm

One of my most favorite timbers conkerberry but have only used it for limb tips and knife handles.It smells like candle wax when you sand it if I remember right.If only it grew like a proper tree hey mate life would be so much simpler.
Cheers KIM

User avatar
Flatliner
Posts: 449
Joined: Fri Apr 08, 2011 6:12 pm
Location: Gordonvale NTH QLD

Re: Flatline opus 1&2

#20 Post by Flatliner » Wed May 18, 2011 8:58 pm

Yeah Kim, Knife handles and limb tips is about the size of it. I've been very lucky to get the opportunity to find and collect Conkerberry of this size. When these bows are finished I'm pretty sure they will be the only two of there kind in the world (hope I don't screw it up :lol: )and if it grew like a normal tree every body would have one :P .
Clouds,,,, surface,,,, great storm,,, it's all the same from this distance Craig :lol: and Mark will be upset considering in a way, he helped me get here :wink: .
Rob.
Last edited by Flatliner on Tue Aug 02, 2011 4:45 pm, edited 2 times in total.
The shortest distance between two points is a FLATLINE
ImageEmail; robnicoll(at)bigpond(dot)com
www.flatlinebows.com.au

ozzyshane
Posts: 25
Joined: Thu Jul 29, 2010 1:26 pm

Re: Flatline opus 1&2

#21 Post by ozzyshane » Wed May 18, 2011 9:41 pm

Rob this is going to be a great thread Thnaks Shane

User avatar
hazard
Posts: 1516
Joined: Sun Jan 16, 2011 5:45 pm
Location: Maraylya

Re: Flatline opus 1&2

#22 Post by hazard » Thu May 19, 2011 4:52 pm

Yes the appearance does look like the dust and gas clouds on Jupitor, I got that impression when I looked at the pickies as well.

This is turning out to be a very good thread. Keep us posted I'm still watching, I wanna see the end product.

I wouldn't mind a bit of insight into techniques preferences and lessons learned. you show to be quite an experienced Bowyer, your techniques and what made you take choose certain tacts and methods goes a long way, being a novice I hang on every detail.
Politics is a game played by dishonest people to gain an unfair advantage!

Never under estimate the strength of a cornered coward.

Everyone is entitled to be stupid, but some abuse the privilege.

http://www.bowmanstaxidermy.com.au
Image

User avatar
rodlonq
Posts: 2096
Joined: Wed May 06, 2009 3:02 pm
Location: Ingham NQ

Re: Flatline opus 1&2

#23 Post by rodlonq » Thu May 19, 2011 9:19 pm

Great progress Rob, you have determination and patience in spades mate. Thanks.

Cheers..... Rod

User avatar
Flatliner
Posts: 449
Joined: Fri Apr 08, 2011 6:12 pm
Location: Gordonvale NTH QLD

Re: Flatline opus 1&2

#24 Post by Flatliner » Sat May 21, 2011 8:14 pm

Time for another episode in the continuing saga of the Flatline opus bows.
After repeating the same, though more complex process for the second set off limb blanks I ran them through the lam grinder this morning and they came up OK.
I couldn't get the full width of the limb profile out of two of the pieces so I machined a couple of strips from other pieces and laminated them into the center of the limb to maintain some of the white boarder down the sides. The strips in the middle came up a lot darker than the surrounding wood, (surprising really considering it's from the same stick) I guess it's just because they're back-cut and the rest is quarter-cut.
SDC11068.JPG
SDC11068.JPG (115.52 KiB) Viewed 7705 times
So now I have the blanks to grind my veneers out of.

I should probably point out that many of the processes I am using here are not my standard bow building methods. Although this thread will contain the whole normal process, (among all the added extras) in the end. A lot of what I've done so far and plan to do are firsts for me, so if you see me doing something the hard or stupid way and you can come up with a better method, please let me know, I figure 2-50 heads are better than one. :)

I've been thinking of how to get a little Beefwood into the mix with out cutting into the integral beauty of the Conkerberry and have gone with the Gum leaf theme again, the shape lends it's self well to easy band saw cuts and bending thin veneers around.

Flatline take down risers are made from four thin slabs of wood with usually contrasting thin timber veneers between. I normally start with a block of timber 90mm x50mm x520mm and rip it on the band saw into two bits 90 x13 and two at 90 x10 and machine them down to 90 x11(which become the center of the riser) and 90 x8 (which become the out side faces of the riser). I carefully select and turn these pieces so that the grain of one piece opposes the grain of the one adjacent to it in the finished block, along with the veneers laminated in between, this method pretty much stabilizes all of the inherent stresses and tensions in the timber caused by climatic and environmental conditions.

Now the reason I went off into that rave was to get to this, I'm going to put the Gum leaves in the sight windows and they will only be laminated into one of the above mentioned 'thin slabs' (obviously the one that is shown in the sight window) so it doesn't come through the Conkerberry I plan to use for the out side faces. (Remember I'm building two bows)
And here's a picture.
SDC11070.JPG
SDC11070.JPG (165.96 KiB) Viewed 7700 times
And after I made the cuts.
SDC11073.JPG
SDC11073.JPG (196.31 KiB) Viewed 7699 times
And here's the start of what I plan to put in there, the Conkerberry strips have been tapered to 0.001"/1" using a master taper so they are thin at the tip of the leaf and thick at the base of the leaf. I'll wrap a double veneer of Conkerberry/Silver Ash around the out side of the leaf when it goes into the riser block.
SDC11079.JPG
SDC11079.JPG (178.26 KiB) Viewed 7699 times
Thanks for the feedback guy's, I don't know about experienced bowyer Hazard, experienced timber crafter perhaps, I made my first Self bow just over three years ago but I'm a Fast learner when I'm interested (or should I say obsessed) and questions and suggestions about method and technique are welcome any time.

Tune in next week for the next exciting episode of,,,,,, I must have rocks in my head,,,,Brought to you by Flatline Bows :roll: :lol: .

Rob.
Last edited by Flatliner on Tue Aug 02, 2011 4:53 pm, edited 1 time in total.
The shortest distance between two points is a FLATLINE
ImageEmail; robnicoll(at)bigpond(dot)com
www.flatlinebows.com.au

User avatar
bigbob
Posts: 4098
Joined: Sat Jul 10, 2010 8:55 pm
Location: sunshine coast

Re: Flatline opus 1&2

#25 Post by bigbob » Sun May 22, 2011 1:45 pm

Highly intriguing, and a great thread.
nil illigitimo in desperandum carborundum
razorbows.com

User avatar
Nephew
Posts: 3046
Joined: Thu Aug 23, 2007 1:28 pm
Location: Coochiemudlo Island,Moreton Bay, Qld.

Re: Flatline opus 1&2

#26 Post by Nephew » Sun May 22, 2011 3:19 pm

Flatliner wrote: Clouds,,,, surface,,,, great storm,,, it's all the same from this distance Craig :lol: and Mark will be upset considering in a way, he helped me get here :wink: .
Rob.
Ignore me next time Rob. I can be an unbearable pedant sometimes, I just can't help myself! :wink: :lol:
Lately, if life were treating me any better, I'd be suspicious of it's motives!

User avatar
Stickbow Hunter
Supporter
Supporter
Posts: 11637
Joined: Sat Jul 26, 2003 8:33 pm
Location: Maryborough Queensland

Re: Flatline opus 1&2

#27 Post by Stickbow Hunter » Sun May 22, 2011 4:12 pm

Looking good Rob; thanks for the update.

Jeff

User avatar
hazard
Posts: 1516
Joined: Sun Jan 16, 2011 5:45 pm
Location: Maraylya

Re: Flatline opus 1&2

#28 Post by hazard » Sun May 22, 2011 7:05 pm

great thread! no doubt about it.
Politics is a game played by dishonest people to gain an unfair advantage!

Never under estimate the strength of a cornered coward.

Everyone is entitled to be stupid, but some abuse the privilege.

http://www.bowmanstaxidermy.com.au
Image

User avatar
Flatliner
Posts: 449
Joined: Fri Apr 08, 2011 6:12 pm
Location: Gordonvale NTH QLD

Re: Flatline opus 1&2

#29 Post by Flatliner » Sun May 22, 2011 7:37 pm

It's all good Craig, I get caught up in the details a lot to, just part of our natures I guess. Thanks for all the "great thread" comments, I wanted to ask you guy's do you want more or less detail on the process, IE photos,comments on methods, materials and technique etc ?

Fiddled around a bit more this afternoon. One of the most difficult lamination fittings I have ever done. I wouldn't normally do it this way, usually I would build it up in layers, but I made the mistake of cutting out the whole leaf shape instead of just one side at a time which made clamping it in layers pretty much impossible,(to keen to see the end result,, :roll: :roll: it's a real trap thinking like that).
I haven't glued it yet but here's what the dry run looks like.
SDC11084.JPG
SDC11084.JPG (175.98 KiB) Viewed 7659 times
there is Conkerberry under that white line running through the center of the leaf, I went over it with the white pen so I could see it better during the fit.
One down one to go :roll: .

My car's still not fixed so I might be able to do a little more tomorrow.
Cheers, Rob.
Last edited by Flatliner on Tue Aug 02, 2011 4:55 pm, edited 2 times in total.
The shortest distance between two points is a FLATLINE
ImageEmail; robnicoll(at)bigpond(dot)com
www.flatlinebows.com.au

User avatar
Nephew
Posts: 3046
Joined: Thu Aug 23, 2007 1:28 pm
Location: Coochiemudlo Island,Moreton Bay, Qld.

Re: Flatline opus 1&2

#30 Post by Nephew » Sun May 22, 2011 7:46 pm

I reckon just keep going as you are, Rob. Everyone seems pretty happy with this thread so far. :)
Lately, if life were treating me any better, I'd be suspicious of it's motives!

Post Reply