Where to source materials etc. Also the place to show off your new bow or quiver etc.... Making things belongs in Traditional Crafts.
Moderator: Moderators
-
Brainbruise
- Posts: 27
- Joined: Tue Feb 13, 2007 12:45 am
- Location: san francisco
#1
Post
by Brainbruise » Mon Jun 25, 2007 11:59 am
Here she is, my beauty. Osage orange, three layers deer leg sinew and rattlesnake skin.

[/img]


[/img]
SHOP SMART, SHOP S-MART, YOU GOT THAT!
-
yeoman
- Posts: 1563
- Joined: Mon Mar 08, 2004 1:32 pm
- Location: Canberra
#2
Post
by yeoman » Mon Jun 25, 2007 12:21 pm
NICE!

-
Stickbow Hunter
- Supporter

- Posts: 11637
- Joined: Sat Jul 26, 2003 8:33 pm
- Location: Maryborough Queensland
#3
Post
by Stickbow Hunter » Mon Jun 25, 2007 12:53 pm
WOW! Those limbs sure are working.

What length bow is it and what draw length are you?
Did you splice the static tips onto the limbs?
Jeff
-
archangel
- Posts: 750
- Joined: Fri Oct 08, 2004 7:26 pm
- Location: York, Western Australia
#4
Post
by archangel » Mon Jun 25, 2007 12:55 pm
brainbruise
Good work, I love the snakeskin treatment - do you have any pictures of the previous stages eg. sinew going on. Also would appreciate a photograph of the bow unstrung - the angle of your siyahs looks much better/steeper than those on my buildalong.
-
Brainbruise
- Posts: 27
- Joined: Tue Feb 13, 2007 12:45 am
- Location: san francisco
#5
Post
by Brainbruise » Mon Jun 25, 2007 1:24 pm
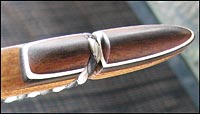
The siyahs are at a 60 degree angle. The bow is 50 inches nock to nock. There is a lot of info on how I made this. I also learned how to make strings. It is rather easy. To get limb twist out I used a clothes iron. I do not think there is a better way. My draw is 28
materials

sinew on
[/img]

tillering done

bow unstrung
[/img]

snakeskin, apply wet

[/img]
SHOP SMART, SHOP S-MART, YOU GOT THAT!
-
greybeard
- Supporter
- Posts: 2992
- Joined: Tue Feb 07, 2006 9:11 am
- Location: Logan City QLD
#6
Post
by greybeard » Mon Jun 25, 2007 6:44 pm
Congratulations on your latest success. Can you give us some performance figures?
The rattlesnake skin adds a great touch. Unfortunately Australian Customs will not allow us to import the skins as they are on some resticted / protected list somewhere in the world. I would love to import some from 3 Rivers but unfortunately they would be siezed at the airport.
Daryl.
"And you must not stick for a groat or twelvepence more than another man would give, if it be a good bow.
For a good bow twice paid for, is better than an ill bow once broken. [Ascham]
“If a cluttered desk is a sign of a cluttered mind, of what, then, is an empty desk a sign?” [Einstein]
I am old enough to make my own decisions....Just not young enough to remember what I decided!....
-
Graeme K
- Posts: 629
- Joined: Thu Feb 02, 2006 9:38 pm
- Location: Sydney Glenorie
#7
Post
by Graeme K » Mon Jun 25, 2007 8:50 pm
Hi Brainbruise
Great looking bow. The osage and sinew can really take a huge bend.
I am interested in how you joined the siyahs to the core -- if you have any photos It would be great to see them.
Graeme
-
archangel
- Posts: 750
- Joined: Fri Oct 08, 2004 7:26 pm
- Location: York, Western Australia
#8
Post
by archangel » Mon Jun 25, 2007 10:07 pm
Ohhhhhhhhhhhhhhh, look at the sinew!!! Come on, you Oz deer hunters. Who's going to be first to supply us horsebow fanatics with some deer sinew? I'll happily pay expenses for anyone willing to spend some time drying off some good chunks of sinew like this.
BB - thanks for those pics they re exactly what I was after. Your bow was actually quite straight - how different it looks when fully drawn. Like the other comments, I'm keen to hear more your method of attaching your siyahs.
-
Graeme K
- Posts: 629
- Joined: Thu Feb 02, 2006 9:38 pm
- Location: Sydney Glenorie
#9
Post
by Graeme K » Mon Jun 25, 2007 10:39 pm
Hi Brainbruse
I have been looking at the photos of the the unstrung bow and I am surprised that it does not have more reflex from the sinew being applied. So I guess the question is did you loose it all to set when you strung it or was there no reflex from the sinew to begin with.
Graeme
-
Brainbruise
- Posts: 27
- Joined: Tue Feb 13, 2007 12:45 am
- Location: san francisco
#10
Post
by Brainbruise » Mon Jun 25, 2007 11:27 pm
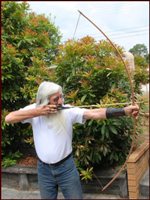
This was my first use of osage and sinew. I was not sure how much the sinew would pull to cause reflex so I left it straight. I knew this bow would be under great stress so no reflex without a horn belly just in case. Osage is the best wood for elasticity and compression, I figured it could handle the work but a refles may have been asking to much. My original plan was to reverse string, lay sinew to get some reflex. Now for the siyahs. I glued them on with titebond II (CRAZY) and wrapped with more sinew. It works. I took a chance but figured if it did not hold I would use epoxy. This little demon spits an arrow faster than all my bows, I will take it to my local shop and use the crono to get an exact speed. i will say that I have used several types of backings and sinew is the best.

[/img]

SHOP SMART, SHOP S-MART, YOU GOT THAT!
-
Graeme K
- Posts: 629
- Joined: Thu Feb 02, 2006 9:38 pm
- Location: Sydney Glenorie
#11
Post
by Graeme K » Tue Jun 26, 2007 9:41 am
Hi Brainbruse
What I was really trying to find out was what the joint was like for the siyahs. Did you glue them into a "V" slot in the limb or just glue them to the surface?
Graeme
-
Brainbruise
- Posts: 27
- Joined: Tue Feb 13, 2007 12:45 am
- Location: san francisco
#12
Post
by Brainbruise » Tue Jun 26, 2007 10:39 am
I glued them to the surface and left a small lip at the back of the siyah to but against the limb tip.
SHOP SMART, SHOP S-MART, YOU GOT THAT!