Bamboo Glass Composite buildalong (Clamp Method)
Moderator: Moderators
-
longbow steve
- Posts: 3116
- Joined: Tue Jan 30, 2007 3:29 pm
- Location: BLUE MOUNTAINS
Bamboo Glass Composite buildalong (Clamp Method)
Photographed my latest bow building exercise, similar to Jeffs Buildalong but with the G clamp method and Laminations ground from raw bamboo.
- Attachments
-
- Splitting bamboo pole
- steves2 056.jpg (56.14 KiB) Viewed 4047 times
-
longbow steve
- Posts: 3116
- Joined: Tue Jan 30, 2007 3:29 pm
- Location: BLUE MOUNTAINS
Clean, blemish free bamboo of large enough diameter to make wide laminations. For use under clear glass i make sure only spotless bamboo is used otherwise it is discarded for backing selfbows.
- Attachments
-
- cutting split bamboo
- steves2 058.jpg (55.99 KiB) Viewed 4041 times
-
- Clean Bamboo
- steves2 057.jpg (49.11 KiB) Viewed 4041 times
-
longbow steve
- Posts: 3116
- Joined: Tue Jan 30, 2007 3:29 pm
- Location: BLUE MOUNTAINS
-
longbow steve
- Posts: 3116
- Joined: Tue Jan 30, 2007 3:29 pm
- Location: BLUE MOUNTAINS
Bamboo can now be flipped and ground until the concave side is flat, then return to the rind side and grind until approx 4mm thickness before tapering to required dimension.
- Attachments
-
- plenty of width
- steves2 065.jpg (34.5 KiB) Viewed 4027 times
-
- ground to pre taper dimension
- steves2 064.jpg (37.5 KiB) Viewed 4027 times
-
- establishing a flat surface on the inside
- steves2 062.jpg (31.25 KiB) Viewed 4030 times
-
longbow steve
- Posts: 3116
- Joined: Tue Jan 30, 2007 3:29 pm
- Location: BLUE MOUNTAINS
The tapering process is covered in Jeffs buildalong so I wont repeat it.
The handle shape and construction is also brushed over as it is the same.
The handle timber selected is Bubinga, for strength and beauty.
After spending 20 minutes or more in the hot box, laminations ,glass and handle are laid out in order of assembly.
The handle shape and construction is also brushed over as it is the same.
The handle timber selected is Bubinga, for strength and beauty.
After spending 20 minutes or more in the hot box, laminations ,glass and handle are laid out in order of assembly.
- Attachments
-
- Handle section marked out ready for cutting on the bandsaw
- steves2 066.jpg (38.87 KiB) Viewed 4016 times
-
- Laminations, Glass, handle section, clamping cauls layed out in sequence
- steves2 002.jpg (58.48 KiB) Viewed 4016 times
-
longbow steve
- Posts: 3116
- Joined: Tue Jan 30, 2007 3:29 pm
- Location: BLUE MOUNTAINS
The glue used is a 2 part epoxy, ratio for mix is 2-1 resin to hardener and I have had no trouble measuring quantities using dessert spoons and butter knives although recommend o be measured by weight.
It is also reccomended that the glue be measured into 2 quantities to avoid the gle going off, especially in the warmer climates.
It is also reccomended that the glue be measured into 2 quantities to avoid the gle going off, especially in the warmer climates.
- Attachments
-
- Glu thoroughly mixed
- steves2 005.jpg (50.67 KiB) Viewed 4010 times
-
- Two parts measured
- steves2 004.jpg (53.97 KiB) Viewed 4013 times
-
Stickbow Hunter
- Supporter

- Posts: 11637
- Joined: Sat Jul 26, 2003 8:33 pm
- Location: Maryborough Queensland
-
longbow steve
- Posts: 3116
- Joined: Tue Jan 30, 2007 3:29 pm
- Location: BLUE MOUNTAINS
The form I use is steel square section, draw filed flat. The form must be able to withstand the heat of the hotbox so needs to be constructed of either laminated timber or timber that is very stable.
Cling wrap is placed over the form to avoid any glue overflow.
The clean backing glass is then thoroughly buttered with epoxy and placed on the form.
Cling wrap is placed over the form to avoid any glue overflow.
The clean backing glass is then thoroughly buttered with epoxy and placed on the form.
- Attachments
-
- Backing glass
- steves2 006.jpg (58.19 KiB) Viewed 4006 times
-
- Steel form
- steves2 001.jpg (63.67 KiB) Viewed 4006 times
-
longbow steve
- Posts: 3116
- Joined: Tue Jan 30, 2007 3:29 pm
- Location: BLUE MOUNTAINS
-
longbow steve
- Posts: 3116
- Joined: Tue Jan 30, 2007 3:29 pm
- Location: BLUE MOUNTAINS
The first bamboo lam is then buttered and mated to the backing glass.
Upon laying each lamination I press along the length forcing any air pockets out, you all may have seen clear glass bows with small voids, whilst not affect integrity in most cases theyare unsightly. Make sure hands are clean and dry as and oil contamination may cause bow failure.
The bow will have a shorter lower limb so I lay the middle of the central cores coincident to where my shelf will be which is 2" above the centre of the handle. By doing the tiller is pretty much built in and the limbs maintain symmetry of taper and width. hope that makes sense.
Upon laying each lamination I press along the length forcing any air pockets out, you all may have seen clear glass bows with small voids, whilst not affect integrity in most cases theyare unsightly. Make sure hands are clean and dry as and oil contamination may cause bow failure.
The bow will have a shorter lower limb so I lay the middle of the central cores coincident to where my shelf will be which is 2" above the centre of the handle. By doing the tiller is pretty much built in and the limbs maintain symmetry of taper and width.
- Attachments
-
- Staggered inner cores
- steves2 009.jpg (50.42 KiB) Viewed 4001 times
-
- removing air pockets between laminations
- steves2 007.jpg (54.32 KiB) Viewed 4001 times
-
longbow steve
- Posts: 3116
- Joined: Tue Jan 30, 2007 3:29 pm
- Location: BLUE MOUNTAINS
Once the core laminations are on the form, butter the top lam and the underside of the handle and place the handle in the middle of the layup.
I should at this stage say that I have a reference mark on the middle of the form that I align with the centre mark on the handle.
Using care I then clamp the handle section using a large g clamp and a scrap of timber. The glue can be quite slippery so make sure the handle and laminations remain straight, reef down pretty firmly with the clamp.
Being a mechanic by trade I have a good feel for tension,( years of breaking and removing bolts)
Butter the fades adding plenty of glue at the transitions( if you are going to get a glue void it will be here).
- Attachments
-
- glue on fades
- steves2 012.jpg (61.29 KiB) Viewed 3991 times
-
- Clamping handle
- steves2 011.jpg (51.13 KiB) Viewed 3992 times
-
- Placing buttered handle on the lay up
- steves2 010.jpg (54.42 KiB) Viewed 3992 times
-
longbow steve
- Posts: 3116
- Joined: Tue Jan 30, 2007 3:29 pm
- Location: BLUE MOUNTAINS
Next step is to butter the half length belly laminations, belly glass and lay them on the form butting up against the scrap timber used to clamp the handle section.
Cover the lay up with more cling film and place cuals( straight clamping timbers) on the layup overlapping the transition area by 3/4".
Cover the lay up with more cling film and place cuals( straight clamping timbers) on the layup overlapping the transition area by 3/4".
- Attachments
-
- Caul over lapping transition
- steves2 015.jpg (50.97 KiB) Viewed 3987 times
-
- Belly bamboo and glass glued and placed on form
- steves2 014.jpg (65.66 KiB) Viewed 3987 times
-
longbow steve
- Posts: 3116
- Joined: Tue Jan 30, 2007 3:29 pm
- Location: BLUE MOUNTAINS
Clamp the cauls at the transition end, being careful that it remains straight along the length of the limb and repeat on the otherside.
Place handle offcuts and conveyor belt rubber on handle fades and clamp from the cual end towards the centre. ONLY MODERATE PRESSURE NEEDS TO BE APPLIED TO THIS AREA, I watch for the glue to begin squeezing out along the fade, recheck each clamp as you go. To much pressure here may cause the handle to slide along the bow.
Place handle offcuts and conveyor belt rubber on handle fades and clamp from the cual end towards the centre. ONLY MODERATE PRESSURE NEEDS TO BE APPLIED TO THIS AREA, I watch for the glue to begin squeezing out along the fade, recheck each clamp as you go. To much pressure here may cause the handle to slide along the bow.
- Attachments
-
- Fades clamped
- steves2 018.jpg (106.98 KiB) Viewed 3982 times
-
- rubber and handle off cuts to be clamped
- steves2 017.jpg (61.14 KiB) Viewed 3982 times
-
- Caul clamped overlapping transition
- steves2 016.jpg (63.54 KiB) Viewed 3984 times
-
longbow steve
- Posts: 3116
- Joined: Tue Jan 30, 2007 3:29 pm
- Location: BLUE MOUNTAINS
Clamp along the cauls to the ends, use as many clamps as available, I use approximately 20 clamps of varying quality and size. Place layup in the hotbox to cook. 2hrs at 60deg, more time is needed if 60 deg is not acheivable. The hot box serves a few purposes, Sets the glue, drives moisture from the layup, makes for a more durable bow that can withstand the rigours of the hot Australian sun ie Transporting in the car in summer.
- Attachments
-
- Tucked in the hot box, cooked at 60 deg for the night
- steves2 020.jpg (51.08 KiB) Viewed 3981 times
-
- Layup clamped ready for hotbox
- steves2 019.jpg (68.56 KiB) Viewed 3981 times
Hi Steve,
Excellent build a long.
Hopefully it will encourage others to have a go even if they don't have some of the power tools.
Daryl.
Excellent build a long.
Hopefully it will encourage others to have a go even if they don't have some of the power tools.
Daryl.
"And you must not stick for a groat or twelvepence more than another man would give, if it be a good bow.
For a good bow twice paid for, is better than an ill bow once broken. [Ascham]
“If a cluttered desk is a sign of a cluttered mind, of what, then, is an empty desk a sign?” [Einstein]
I am old enough to make my own decisions....Just not young enough to remember what I decided!....
For a good bow twice paid for, is better than an ill bow once broken. [Ascham]
“If a cluttered desk is a sign of a cluttered mind, of what, then, is an empty desk a sign?” [Einstein]
I am old enough to make my own decisions....Just not young enough to remember what I decided!....
-
longbow steve
- Posts: 3116
- Joined: Tue Jan 30, 2007 3:29 pm
- Location: BLUE MOUNTAINS
Hi Daryl, I started out with a pretty limited array of tools, still getting set up, next investment will be a coulple of forms and air hose clamping system. I wanted to show people this method as it is probably the way they would start and there are some mistakes that I have made that can easily have been avoided in hind sight. Steve

Hi Steve
Great to see another build -- I know it is a bit of a pain to take all the photos and stuff but it is the best incentive for people to have a go and we need more people building bows -- we are the clever country after all.
I like the look of that bamboo pole you used -- I called in to Bamboo Australia up in Queensland while I was on holidays because I found that the bamboo that I ordered and had sent down was never very good but the stuff I had to choose from was not much better so I am looking for a different supplier.
Graeme
-
longbow steve
- Posts: 3116
- Joined: Tue Jan 30, 2007 3:29 pm
- Location: BLUE MOUNTAINS
After sufficient time in the hot box clamps can be removed, the handle section is the first to be sanded to reveal the quality of glue lines and for marking out the bow shape.
One of my best investments was a resprator, the cheapest on the market but good quality as long as you arent to rough. Lungs are so expensive to replace these days
One of my best investments was a resprator, the cheapest on the market but good quality as long as you arent to rough. Lungs are so expensive to replace these days
- Attachments
-
- Triton Respirator
- steves2 024.jpg (56.83 KiB) Viewed 3957 times
-
- Sanding handle area
- steves2 023.jpg (61 KiB) Viewed 3957 times
-
- handle area
- steves2 022.jpg (33.71 KiB) Viewed 3957 times
-
longbow steve
- Posts: 3116
- Joined: Tue Jan 30, 2007 3:29 pm
- Location: BLUE MOUNTAINS
Hi Graeme, I get my Bamboo form Bamboo Australia, You need to get the Moso boiled in Hydrogen Pyroxide, They allow you to go through their supplies. I have been there once, and the rest I have had sent via courier but specified STRAIGHT, LARGE ,DIAMETER and CRACK FREE. They have been very accomodating even sending me free poles when I stuffed up my order and didnt specify the bleached poles.
I order regularly and would welcome sharing courier costs with anyone wanting deliveries to the Sydney area. Steve
I order regularly and would welcome sharing courier costs with anyone wanting deliveries to the Sydney area. Steve
-
longbow steve
- Posts: 3116
- Joined: Tue Jan 30, 2007 3:29 pm
- Location: BLUE MOUNTAINS
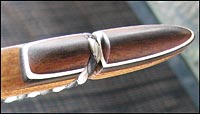
After a moment of anxiety it is nice to reveal perfect glue lines along the fades and at the transition areas.
Place some masking tape along the back of the bow and square of the centre line, mark lines 8" either side of the centre line, being a 16" handle this should coincide with the ends of the fade outs.
Measure across the centre line, to establish width 35mm being origional handle dimension. measure this dimension at the end of fade area and from fade to the centre line mark a cross form corner to corner then repeat on the other side.
Once you have 2 crosses you can establish a centre line.
- Attachments
-
- Handle area marked with centre line
- steves2 027.jpg (38.64 KiB) Viewed 3943 times
-
- Glue lines on fade
- steves2 025.jpg (32.81 KiB) Viewed 3943 times
-
- glue lines on fade
- steves2 026.jpg (31.2 KiB) Viewed 3943 times
-
longbow steve
- Posts: 3116
- Joined: Tue Jan 30, 2007 3:29 pm
- Location: BLUE MOUNTAINS
-
longbow steve
- Posts: 3116
- Joined: Tue Jan 30, 2007 3:29 pm
- Location: BLUE MOUNTAINS
This bow will be 68" , The lower limb will be 2" shorter than the upper in order to bring the centre of the bow just below the arrow shelf.
You need to allow an inch extra on either end for sculpting the tip so from the centre line of the bow the lower limb will measure 34" and from the centre line to the end of upper limb will equal 36" totaling 70".
Clamp timbers on the end of the limb, overlapping the the underside to prevent splintering of the glass.
- Attachments
-
- Cutting end of limb
- steves2 030.jpg (46.58 KiB) Viewed 3937 times
-
- Rule line at end of limb
- steves2 029.jpg (39.12 KiB) Viewed 3937 times
-
longbow steve
- Posts: 3116
- Joined: Tue Jan 30, 2007 3:29 pm
- Location: BLUE MOUNTAINS
Once the length has been established, a cente line is ruled along the length of the bow. Placing a straight edge aligned with already established centre along the length of the limb and continue line to the end of the limb.
From the centre line of each limb measure and mark 1/2".
Note the use of Jape's cheap clamps.
From the centre line of each limb measure and mark 1/2".
Note the use of Jape's cheap clamps.
- Attachments
-
- Limb centre line, side lines marked out.
- steves2 033.jpg (40.05 KiB) Viewed 3920 times
-
- marking limb side line
- steves2 032.jpg (58.28 KiB) Viewed 3920 times
-
- marking limb centre line
- steves2 031.jpg (54.23 KiB) Viewed 3920 times
Last edited by longbow steve on Tue May 29, 2007 9:36 pm, edited 1 time in total.
Looks great Steve. Looks just like home - right down to the blue record clamps and the generic grey ones.
I know the work that goes in to all of this. It is not as simple as it looks in the photographs.
Have you got 5 laminations in this bow excluding the glass? Is this done to stager the nodes? What draw weight are you expecting to achieve?
I would encourage new bowyers that want to have a go at this, to expect the first bow to be a practice. For me it has taken a good handful of bows to begin to accurately predict the draw weights.
-
longbow steve
- Posts: 3116
- Joined: Tue Jan 30, 2007 3:29 pm
- Location: BLUE MOUNTAINS
Hi Steve, I was just wondering if anyone was still with me, Yeah the record clamps are good but at $20 each I couldnt justify more.
Did you count 5 lams? I normally use 4 but this is a big one, aim is 75#, just quietly I hit the mark first attempt but that is a suprise for later, I dont think any one knows that I am not building this in real time .
.
Would you travel to Nowra for a competition??? Steve
With regard to predicting draw weight, record dimension of every bow you make, there is a bit of difference between timber and bamboo though.
Did you count 5 lams? I normally use 4 but this is a big one, aim is 75#, just quietly I hit the mark first attempt but that is a suprise for later, I dont think any one knows that I am not building this in real time
Would you travel to Nowra for a competition??? Steve
With regard to predicting draw weight, record dimension of every bow you make, there is a bit of difference between timber and bamboo though.
-
longbow steve
- Posts: 3116
- Joined: Tue Jan 30, 2007 3:29 pm
- Location: BLUE MOUNTAINS
next step is to cut the limb profile, I use an old saw blade for this on the circular saw. The bandsaw is no good unless you wish to spend $300 on a blade suitable for Cutting fibreglass, a hacksaw is fun for a minute or so , the linisher works well but is very dusty, an electric plane is also an option with suitable blades
- Attachments
-
- rough shape cut out
- steves2 036.jpg (43.08 KiB) Viewed 3906 times
-
- cutting limb profile
- steves2 035.jpg (52.71 KiB) Viewed 3906 times

Sorry for ruining the surprise. 75lb - what kind of a man are you. Can you post a picture of your arms. Do you have a wide angled lens?
Oh, I thought this was real time. I thought that you must have had the bow in the oven for 3 minutes at 4000 degrees so that you could whip it out and keep working for us.
Nowra is really almost all the way to Sydney for us down here. If it was just me - no family - yeah 'course I would. I am sure that we will catch up one day. Are you heading to the Gathering? I am.
I record all the details of my bows on a spreadsheet so that I can graph the draw weight against the reference thickness. That way over time I should be able to produce a nice set of data that I can obtain a nice mathematical equation for the draw weight of my bows. It is definitely a skill that requires a number of attempts - any bowyer would testify to that.
-
longbow steve
- Posts: 3116
- Joined: Tue Jan 30, 2007 3:29 pm
- Location: BLUE MOUNTAINS
At this stage I put the bow through the sander to double check the square of the handle to limbs, a luxury of having a drum sander, not a necessity.
Mark the length of the bow at each end, draw a 45 deg line from these points and cut slightly with a hacksaw, this wll be a guide for the chainsaw file.
Mark the length of the bow at each end, draw a 45 deg line from these points and cut slightly with a hacksaw, this wll be a guide for the chainsaw file.
- Attachments
-
- Filing string grooves
- steves2 042.jpg (29.56 KiB) Viewed 3902 times
-
- cutting along the nock line as a guide for the file
- steves2 041.jpg (46.61 KiB) Viewed 3902 times
-
- 45 deg marked
- steves2 040.jpg (32.82 KiB) Viewed 3902 times
-
- string groove length marked on limb end
- steves2 038.jpg (37.1 KiB) Viewed 3902 times