Hi All
Some time ago I bored all of you almost to death with the tale of my WARF bow - which continues to go from strength to strength.
I also foolishly said I was going to make another.
Well, sometime ago a number of compound risers came into my possession. Another somewhat newer Hoyt - a left-handed version no less. A Martin - very nice but the angle on the limbs is a little extreme. And a Darton.
I have no idea of the age of the Darton but it is old and it had a nice rounded shape about it. On top of that it had a really nice handle to it and the limb angle was not to bad. So I made a decision to go with the Darton and dis-assembled it.
File this for future reference. The Darton handle is just a force fit and with a bi8t of levering with a bar the handle will eventually come off. The plastic limb fittings are held on with double sided tape. (Actually I have no idea what sort of double sided tape it is but I want some. You have no idea how hard it was to get off.
So eventually I had it dis-assembled and had a good look over it. Not to shabby and interesting.
Now, if I was going to use bolt on limbs as I had done with my previous, it would be relatively easy to fit them.
Actually after the first one and the pain I have gone through with the current one it has lots in its favour. The more you do with this stuff the more you learn.
But I had made a decision early in the piece that I wanted to have a set of ILF limbs on this one.
Anyhow as I had no limbs I decided to spend a bit of time learning. I dropped a note to the WARF-meister, Bob Gordon, who once again gave me some pointers. I also went and took a stack of photos of ILF limb fittings and checked to see if I could buy 'Win & Win' fittings as a spare part.
Bob also suggested that in the end I needed to try and get my finished product with a limb angle close to that of a FITA bow.
About this point in time a set of ILF Carbon Limbs came up for sale on Archery Forum. Two pm's later and they were mine. When they arrived I unpacked them and then sat and thought about how I was going to marry the two together. I really spent a bit of time thinking about it.
Needing a bit more information regarding the limb angle I did the usual thing and asked if anyone knew what the limb angle was on a FITA bow, on a couple of FITA forums. The silence was deafening - I don'ty think this question is asked often. Anyhow not be beaten I went and measured a few bows - not as simple as it seems. One also needs to be a little wary here as the ILF limbs have an angled base and so will reduce the angle.
At the suggestion of one of the member of Sagittarius forum I emailed O.L. Adcock direct and got a reply several days later. His suggestion was good enough for me to go with a straight adapter plate.
After a bit more reading - have you any idea how much information you can get from the various Archery Patents and the information is all available free on line - I made the decision to fit the limbs similar to the method used on the Hoyt Gamemaster.
So now I am at the stage where I have a riser on the workbench, A set of Carbon limbs which have had the ILF dovetail section pressed out. A few UNC bolts to assemble it together plus a couple of rough shaped adapter plates.
To be continued........
Something lie a WARF 2 - The Darto-Mick
Moderator: Moderators
Something lie a WARF 2 - The Darto-Mick
Grahame.
Shoot a Selfbow, embrace Wood Arrows, discover Vintage, be a Trendsetter.
"Unfortunately, the equating of simplicity with truth doesn't often work in real life. It doesn't often work in science, either." Dr Len Fisher.
Shoot a Selfbow, embrace Wood Arrows, discover Vintage, be a Trendsetter.
"Unfortunately, the equating of simplicity with truth doesn't often work in real life. It doesn't often work in science, either." Dr Len Fisher.

Not too sure what you are planning on doing Grahame. Do you intend to replace the dovetail with a bolt?
A couple of photos would help
This is a great project by the way. The W&W bows seem to have the ILF pockets cast into the riser but some of the Samicks appear to have a seperate pocket. Might be worth a look.
Tony
A couple of photos would help
This is a great project by the way. The W&W bows seem to have the ILF pockets cast into the riser but some of the Samicks appear to have a seperate pocket. Might be worth a look.
Tony
Hi All
A few photos. Excuse them being an extra couple of days but I have been off doing other things.
The last photo shows the bow where it is at the moment. I probably will not get back to it until late this week so it will be a few days before I shoot it.
As a comment if I was doing it again I would try and make an adapter plate that took the ILF dovetail. However to do that I would probably either mill the slot - and I do not have access to a mill - or chain drill it and countersink then cut file it out. (Perhaps next time.)
The amount of time I have spent thinking about this is probably 5 times the amount of time I have actually spent doing it.
But it is coming together,
- Attachments
-
- Limb attached to the adapter plate and the riser. The end of the limb is held in place by one of the original bolts that came with the riser. The other bolt goes through the hole where the ILF dove tail fitting was and screws into the adapter plate.
- adapter_plate.jpg (28.94 KiB) Viewed 7470 times
-
- Just the limb and the end of the riser sitting up against ecah other so I could get a visualisation of how it would go together.
- limb_match.jpg (40.16 KiB) Viewed 7481 times
-
- The riser and the limb. Because of the shape of the limb end the limb angle can be adjusted when fitted to a ILF socket. This was causing me lots of heartache.
- dart_and_limb.jpg (24.2 KiB) Viewed 7470 times
-
- Measuring the angle of the end of the riser.
- measure_anglejpg.jpg (31.02 KiB) Viewed 7484 times
-
- Typical ILF limb pocket.
- ilf_receiver.jpg (31.26 KiB) Viewed 7484 times
-
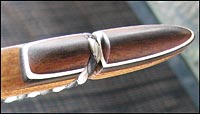
- End fiting for an ILF limb. The dovetail fitment can be clearly seen. This has been removed by pressing it out. To remove you undo the screw, remove the spring and detent. Then press it out. Do not take to it with a hammer! Save the bits.
- ilf_limb_fitting.jpg (26.46 KiB) Viewed 7485 times
-
- The end of the riser after a trip to linisher.
- darton_end_fit2.jpg (21.32 KiB) Viewed 7473 times
-
- The end of the riser after a bit levering to remove the orignal compound limb fitting. There is a casting mark running down the centre of the surface which will have to be removed.
- darton_end_fit.jpg (50.81 KiB) Viewed 7473 times
-
- Darton Compound Riser. Circa many years ago.
- darton.jpg (28.48 KiB) Viewed 7474 times
-
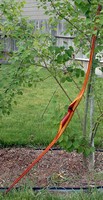
- The bow more or less together. The adapter plates need to locked in place and finished off. To lock them in place a 1/8" UNC socket headed screw will go through the end of the plate and into the body of the riser.
- bow.jpg (23.25 KiB) Viewed 7472 times
Last edited by GrahameA on Mon Oct 09, 2006 2:40 pm, edited 1 time in total.
Grahame.
Shoot a Selfbow, embrace Wood Arrows, discover Vintage, be a Trendsetter.
"Unfortunately, the equating of simplicity with truth doesn't often work in real life. It doesn't often work in science, either." Dr Len Fisher.
Shoot a Selfbow, embrace Wood Arrows, discover Vintage, be a Trendsetter.
"Unfortunately, the equating of simplicity with truth doesn't often work in real life. It doesn't often work in science, either." Dr Len Fisher.
Hi Tony
Hope all the photos help. I went and looked at trying to purchase a Samick (or is it W&W?) end fitting and just bolting it in place but it does not seem to be available as a spare part. It would make things much easier if if they were.
The restraining bolts are 5/16". The hole in the limbs appear to 3/8" so you need to pack them somehow. I will probably make some bushes along the line out of polyproplene. (Cutting boards are nice sources.)
I will also need to fit something in front of the limb to support the other side of the washer. Otherwise it may just twist and allow the limb to move.
The 1/8" retainers will go through the top of the adapter plate.
I think it is Jindy who has an old Darton - he should be salivating soon
Grahame.
Shoot a Selfbow, embrace Wood Arrows, discover Vintage, be a Trendsetter.
"Unfortunately, the equating of simplicity with truth doesn't often work in real life. It doesn't often work in science, either." Dr Len Fisher.
Shoot a Selfbow, embrace Wood Arrows, discover Vintage, be a Trendsetter.
"Unfortunately, the equating of simplicity with truth doesn't often work in real life. It doesn't often work in science, either." Dr Len Fisher.
Grahame, I know you have spent many hours thinking this through but before final assembly a couple of things to consider:
It may be worth building in a small amount of adjustment into the 1/8" retainers or the bolt that replaces the dovetail to facilitate string alignment. It would be very difficult to determine if the string will line up with the limbs prior to final assembly. On the ILF pocket this is achieved with an excentric cam under the retaining bolt. Hmmm, I think i just answered my own question as to how to build this adjustment in. Sorry, just thinking out loud as i type.
The angled base of the limb is for weight/tiller adjustment. It would be nice if you could build that in too.
You're probably aware of all this but as soon as i saw the photos i started thinking.
Keep us informed.
Tony
It may be worth building in a small amount of adjustment into the 1/8" retainers or the bolt that replaces the dovetail to facilitate string alignment. It would be very difficult to determine if the string will line up with the limbs prior to final assembly. On the ILF pocket this is achieved with an excentric cam under the retaining bolt.
The angled base of the limb is for weight/tiller adjustment. It would be nice if you could build that in too.
You're probably aware of all this but as soon as i saw the photos i started thinking.
Keep us informed.
Tony
Hi Tony
All suggestions gratefully accepted.
I had a look at the patents regarding the limb adjusters - they are available free on-line. And I was thinking of making an off-centre bush etc. However, there is not a lot of space to do the offset. The size of the semi-circle in the ned of the limb is 3/8" and the bolt is 5/16".
At the moment I can tighten up the base so that it is hard to move.
The current intention is to tighten up the adapter plate and string the bow, low brace height, with wire or similar and get the string running down the centre of the limbs. I will have pre-drilled the adapter plate and will then drill the riser in-situ.
As far as adjusting the limb tiller. Not an issue. To do it all you need is a spacer to go under the limb to act as a stop. At this stage it bottoms out on the riser itself. It is easy to make some washers that go under the limb to provide tiller/poundage adjustment.
So far this is turning out to be one of those projects that as soon as you implement one solution you come up with a better.
Grahame.
Shoot a Selfbow, embrace Wood Arrows, discover Vintage, be a Trendsetter.
"Unfortunately, the equating of simplicity with truth doesn't often work in real life. It doesn't often work in science, either." Dr Len Fisher.
Shoot a Selfbow, embrace Wood Arrows, discover Vintage, be a Trendsetter.
"Unfortunately, the equating of simplicity with truth doesn't often work in real life. It doesn't often work in science, either." Dr Len Fisher.
-
Stickbow Hunter
- Supporter

- Posts: 11637
- Joined: Sat Jul 26, 2003 8:33 pm
- Location: Maryborough Queensland
Hi All
I have been having heaps of thoughts about this and was almost to the stage of starting from scratch again with the adapter plates and even considered buying a riser on Archery forum.
Anyhow this afternoon I walked out into the workshop and just did it.
Assembled the bow. Put a string line on it and lined up the limbs. Setup a drill with a tapping sized drill bit and drilled the holes. Through the plate and through the riser in one go.
Then it was just a matter of matter of tapping the riser holes and putting a clearance drill through the adapter plates.
Assembled the whole and grabbed a string. Then, with heart in mouth, I strung it.
It worked. I really got carried away at this point and shot two arrows of the shelf. Very smooth. The carbon limbs are much better than my "el cheapo" Internatures on the other WARF.
Okay now for photos:-
Tony in one of the photos you can see that the limbs are not bottomed out. You can adjust the tiller. I will make some spacers to go under the limbs to lock it in place once I have the tiller correct.
The other bow in the photos is a Yamaha EX - a true FITA bow - so that you can compare how the WARF looks in comparison.
Next step is to shape up the adapter plates and then paint everything. I will Loctite the lock bolts in place.
But first off time to go and have a celebratory cup of coffee. Woo Hoo - to say I am happy is an understatement. 

I have been having heaps of thoughts about this and was almost to the stage of starting from scratch again with the adapter plates and even considered buying a riser on Archery forum.
Anyhow this afternoon I walked out into the workshop and just did it.
Assembled the bow. Put a string line on it and lined up the limbs. Setup a drill with a tapping sized drill bit and drilled the holes. Through the plate and through the riser in one go.
Then it was just a matter of matter of tapping the riser holes and putting a clearance drill through the adapter plates.
Assembled the whole and grabbed a string. Then, with heart in mouth, I strung it.
It worked. I really got carried away at this point and shot two arrows of the shelf. Very smooth. The carbon limbs are much better than my "el cheapo" Internatures on the other WARF.
Okay now for photos:-
Tony in one of the photos you can see that the limbs are not bottomed out. You can adjust the tiller. I will make some spacers to go under the limbs to lock it in place once I have the tiller correct.
The other bow in the photos is a Yamaha EX - a true FITA bow - so that you can compare how the WARF looks in comparison.
Next step is to shape up the adapter plates and then paint everything. I will Loctite the lock bolts in place.
But first off time to go and have a celebratory cup of coffee. Woo Hoo - to say I am happy is an understatement.
- Attachments
-
- Yamaha EX and the Darto-Mick. The slightly shorter riser is evident.
- ds4.jpg (40.75 KiB) Viewed 7359 times
-
- Risers. The Yamaha is currently being restored thus the primer on it. You can clearly see the difference in length.
- ds3.jpg (47.44 KiB) Viewed 7363 times
-
- Here you can see the end of the riser sitting off the adapter plate. You can adjust both the tiller and the limb angle - a little.
- ds2.jpg (31.91 KiB) Viewed 7362 times
-
- The back of the riser with the lock bolt going through it. This stops the adapter plates from rotating.
- ds1.jpg (30.85 KiB) Viewed 7364 times
Grahame.
Shoot a Selfbow, embrace Wood Arrows, discover Vintage, be a Trendsetter.
"Unfortunately, the equating of simplicity with truth doesn't often work in real life. It doesn't often work in science, either." Dr Len Fisher.
Shoot a Selfbow, embrace Wood Arrows, discover Vintage, be a Trendsetter.
"Unfortunately, the equating of simplicity with truth doesn't often work in real life. It doesn't often work in science, either." Dr Len Fisher.
-
Stickbow Hunter
- Supporter
- Posts: 11637
- Joined: Sat Jul 26, 2003 8:33 pm
- Location: Maryborough Queensland
-
Stickbow Hunter
- Supporter
- Posts: 11637
- Joined: Sat Jul 26, 2003 8:33 pm
- Location: Maryborough Queensland
Hi Jeff, et al
Gave it a coat of paint and then stripped it off an gave it another - still don't like this colour so I will probably change it again.
But it looks a little woodish
It shoots well though.
Gave it a coat of paint and then stripped it off an gave it another - still don't like this colour so I will probably change it again.
But it looks a little woodish
It shoots well though.
- Attachments
-
- Img_2061.jpg (46.1 KiB) Viewed 7273 times
Grahame.
Shoot a Selfbow, embrace Wood Arrows, discover Vintage, be a Trendsetter.
"Unfortunately, the equating of simplicity with truth doesn't often work in real life. It doesn't often work in science, either." Dr Len Fisher.
Shoot a Selfbow, embrace Wood Arrows, discover Vintage, be a Trendsetter.
"Unfortunately, the equating of simplicity with truth doesn't often work in real life. It doesn't often work in science, either." Dr Len Fisher.
-
Stickbow Hunter
- Supporter
- Posts: 11637
- Joined: Sat Jul 26, 2003 8:33 pm
- Location: Maryborough Queensland
Hi Jeff
I am reasonablly certain Tony knows the riser is made from that superior product - Aluminium Alloy
Now this is what it looks like and the angles all look great. All we need is a couple of bars drilled and tapped 5/16" UNC. I do not see a lot of work getting this one shooting. (Famous last words.)
How are you placed at whipping up a couple of limbs.
- Attachments
-
- Img_2062.jpg (14.67 KiB) Viewed 7267 times
Grahame.
Shoot a Selfbow, embrace Wood Arrows, discover Vintage, be a Trendsetter.
"Unfortunately, the equating of simplicity with truth doesn't often work in real life. It doesn't often work in science, either." Dr Len Fisher.
Shoot a Selfbow, embrace Wood Arrows, discover Vintage, be a Trendsetter.
"Unfortunately, the equating of simplicity with truth doesn't often work in real life. It doesn't often work in science, either." Dr Len Fisher.
GrahameA check out this thread. It's about using the hoyt provantage riser with Quinn limbs. http://www.tradtalk.com/forums/showthread.php?t=5751
Spec' Update.
Just an update.
I was fortunate enough to put the bow across a set of scales at "Eagle Archery" in Brisbane today and it was showing approx 50lbs at 28".
The original limb specifications show:
25" handle 42lbs @ 28"
23" handle 44lbs @ 28"
IMHO the riser is around 21" or 22" which accounts for a bit of the change and the different limb angle the remainder.
I replaced all of the 1/8" x 1" bolts in it with 1/2" long bolts tonight and wound the limbs down one turn which will drop the poundage a little. This probably close to its final configuration - I just need to adjust the tiller at some stage.
I did some shooting tests with it on Saturday and for me it shoots well. It is capable of shooting 3 arrow groups at 20metres with all arrows touching - so there is nothing wrong with the bow and all the bad shots out it are the result of the archer.
So that is about it. If anyone has any questions just ask and why not have a go yourself.
Grahame.
Shoot a Selfbow, embrace Wood Arrows, discover Vintage, be a Trendsetter.
"Unfortunately, the equating of simplicity with truth doesn't often work in real life. It doesn't often work in science, either." Dr Len Fisher.
Shoot a Selfbow, embrace Wood Arrows, discover Vintage, be a Trendsetter.
"Unfortunately, the equating of simplicity with truth doesn't often work in real life. It doesn't often work in science, either." Dr Len Fisher.
-
Stickbow Hunter
- Supporter
- Posts: 11637
- Joined: Sat Jul 26, 2003 8:33 pm
- Location: Maryborough Queensland
Well, I got to shoot the 'Darto-Mick' this afternoon and I must say its performance was impressive. I didn't even miss the target once (I was shooting right handed) .
The bow looks better in the flesh than the photos on this site indicate. At around 45# at my draw it shot 530 grains woods very well but (not sure I should admit this as Mick Smith might read it) when I shot some syntharras (alloys) the increase in speed was dramatic.
I must admit, for someone who has an old compound riser laying around and wants a recurve, making a WARF bow could be a bit of fun - thats if they can stand having an alloy riser.
It was good to catch up this arvo Grahame.
Jeff
The bow looks better in the flesh than the photos on this site indicate. At around 45# at my draw it shot 530 grains woods very well but (not sure I should admit this as Mick Smith might read it) when I shot some syntharras (alloys)
I must admit, for someone who has an old compound riser laying around and wants a recurve, making a WARF bow could be a bit of fun - thats if they can stand having an alloy riser.
It was good to catch up this arvo Grahame.
Jeff
-
Mick Smith
- Posts: 4957
- Joined: Mon Feb 21, 2005 9:09 pm
- Location: Surf Coast Victoria
Hi Jeff
I finally got home. Bruce Highway - Bruce Goat Track more like it!!
Yes, the bow is a surprise. I was stunned by its performance when I took it to the range. And everyone who had shot it has been suprised by it. Both by how well it shoots and how quiet and shock/vibration free it is.
Having read a fair bit about Quarfs, DAS Kinetics and WARFs they all same the same thing. You get a surpising increase in performance over the conventional bow.
Part of that performance comes from the limb, some from the change in limb angle and some from the riser geometry.
As you noticed with mine - the "lower" brace height. That is partly due to difference in the geometry of the riser and it results in a larger section of the force/draw curve being utilised.
I have an opinion that the bow has a fatter force/draw curve than is normal and that is contibuting a fair bit. The increase is probably at the beginning of the draw as well. The whole curve has been rotated anti-clockwise.
I really need to sit down and do a force/draw curve for the bow.
My aim now is to perfect the design a bit more. Whilst it shoots fine I am still not happy with the mounting plates and the 5/16" Cap Screw running through a 3/8 slot is annoying. But once you string it and align it it all seems fine. Looks better with the 1/2" screws in it as well.
Grahame.
Shoot a Selfbow, embrace Wood Arrows, discover Vintage, be a Trendsetter.
"Unfortunately, the equating of simplicity with truth doesn't often work in real life. It doesn't often work in science, either." Dr Len Fisher.
Shoot a Selfbow, embrace Wood Arrows, discover Vintage, be a Trendsetter.
"Unfortunately, the equating of simplicity with truth doesn't often work in real life. It doesn't often work in science, either." Dr Len Fisher.
Hi Buzz
The left-handed riser is still on the bench and have done nothing with it.
Don't tell me you are one of those people with arrows on the wrong side??
The left-handed riser is still on the bench and have done nothing with it.
Don't tell me you are one of those people with arrows on the wrong side??
Grahame.
Shoot a Selfbow, embrace Wood Arrows, discover Vintage, be a Trendsetter.
"Unfortunately, the equating of simplicity with truth doesn't often work in real life. It doesn't often work in science, either." Dr Len Fisher.
Shoot a Selfbow, embrace Wood Arrows, discover Vintage, be a Trendsetter.
"Unfortunately, the equating of simplicity with truth doesn't often work in real life. It doesn't often work in science, either." Dr Len Fisher.
Wrong side? That really depends on your perspective. It would be right for me....  What do the limb pockets look like?
Is there any line of thought about the relationship between riser length and limb angle and what it does to draw weight? Is it linear... so that lighter limbs at the same angles would increase porportionally in the same manner? Is there any stacking?
How did you arrive at a brace height for the "Franken-darton"?
Hi Buzz
Limb Pockets a just a large depression. However the limb bolts go into a bar that can rotate as the bow is wound down. Very easy to work with if you are going to bolt the limbs down.
Stacking as such is not occuring. However, stacking is due more to the angle of the draw getting going down and as such a higher proportion of the force is going into stretching the limb rather than bending the limb. Have a look at the vectors. The force draw for the bow is here:
http://www.ozbow.net/phpbb2/viewtopic.php?t=4255
Note there is no sudden increase ion the draw weight.
Part of the reason for that is lowish brace height and handle geometry.
I set the bow up with a sight. I then shot sets of 3 arrows into a target at 15 metres. Then I would twist up the string 5 turns. Shoot again.
As the bow efficiency, power, etc. changed the arrows would shoot faster and not drop as much. I continued to do this until the placement peaked and started to fall. The brace height is lower than what you normally see however that I believe is due to the riser handle being setback further than is normally the case.
If you have access to a chronograph you can do the same test and plot the arrow velocities.
With any sort of luck the brace height at which the bow is at higest velocity coincides with best group size. At the moment I have no evidence to suggest the brace height is wrong.
Hope that helps.
There is a reason that the Latin for left handed is Sinister.Wrong side? That really depends on your perspective. It would be right for me.... What do the limb pockets look like?
Limb Pockets a just a large depression. However the limb bolts go into a bar that can rotate as the bow is wound down. Very easy to work with if you are going to bolt the limbs down.
I have thought a fair bit about it. It is not linear, however within the angles I have been bending them it is very close to linear. I think - I have not measured it - that it would start to rise sharply a bit further down the curve.Is there any line of thought about the relationship between riser length and limb angle and what it does to draw weight? Is it linear... so that lighter limbs at the same angles would increase porportionally in the same manner? Is there any stacking?
Stacking as such is not occuring. However, stacking is due more to the angle of the draw getting going down and as such a higher proportion of the force is going into stretching the limb rather than bending the limb. Have a look at the vectors. The force draw for the bow is here:
http://www.ozbow.net/phpbb2/viewtopic.php?t=4255
Note there is no sudden increase ion the draw weight.
Part of the reason for that is lowish brace height and handle geometry.
Brace height was determined by velocity testing.How did you arrive at a brace height for the "Franken-darton"?
I set the bow up with a sight. I then shot sets of 3 arrows into a target at 15 metres. Then I would twist up the string 5 turns. Shoot again.
As the bow efficiency, power, etc. changed the arrows would shoot faster and not drop as much. I continued to do this until the placement peaked and started to fall. The brace height is lower than what you normally see however that I believe is due to the riser handle being setback further than is normally the case.
If you have access to a chronograph you can do the same test and plot the arrow velocities.
With any sort of luck the brace height at which the bow is at higest velocity coincides with best group size. At the moment I have no evidence to suggest the brace height is wrong.
Hope that helps.
Grahame.
Shoot a Selfbow, embrace Wood Arrows, discover Vintage, be a Trendsetter.
"Unfortunately, the equating of simplicity with truth doesn't often work in real life. It doesn't often work in science, either." Dr Len Fisher.
Shoot a Selfbow, embrace Wood Arrows, discover Vintage, be a Trendsetter.
"Unfortunately, the equating of simplicity with truth doesn't often work in real life. It doesn't often work in science, either." Dr Len Fisher.
Buzz
No finger pinch.
Spine
I have my test set of arrows. Start shooting them until you find the ones that match.
Crude but very effective.
Note; with the pack out of the arrow rest there is a lot of space around the shaft. So even with the wrong spine you may not get the end of the shaft colliding with the riser.
*********
If I shoot arrows that are to stiff from my long bows you can here the nock end of the arrow hitting the bow as it goes past it. In the case of WARF you could be having similiar issues but it it may not occur as the riser is so heavily cut away. Will take some photos.
Read this post, it has a bit of heresy in it. But I am of the opinion that Frangelli is correct and it starts to question some of the accepted beliefs.
http://sagittarius.student.utwente.nl/b ... php?t=2909
Grahame.
Shoot a Selfbow, embrace Wood Arrows, discover Vintage, be a Trendsetter.
"Unfortunately, the equating of simplicity with truth doesn't often work in real life. It doesn't often work in science, either." Dr Len Fisher.
Shoot a Selfbow, embrace Wood Arrows, discover Vintage, be a Trendsetter.
"Unfortunately, the equating of simplicity with truth doesn't often work in real life. It doesn't often work in science, either." Dr Len Fisher.
Re:
Jeff,Stickbow Hunter wrote:Glad it worked out Grahame but as I always say, it would be much nicer with a WOOD riser!
Jeff
There is a certain amount of bend and flex in timber risers. From what I have read on the subject of "Warfing", two risers one wood and the other metal, that have identical length and angle of limb attachment, the metal Warf will be 5 to 10 feet per second faster, because its flexing less under load
No one can pretend a Warf is a good looking bow. If asthetics are important, you are reading the wrong thread.............
Have a look at Morrison bows if you like pretty in ILF limb fitting.
http://www.morrisonarchery.com/
The object of the exercise is making a hunting bow that is smoking fast, using state of the art Olympic class recurve limbs.
Graham,
here is a link to a source of ILF limb fittings, which may or may not be useful to you.
http://www.tradtecharchery.com/Details. ... No=4090044
Three things you can never take back, time past, an angry word and a well sped arrow
-
Stickbow Hunter
- Supporter
- Posts: 11637
- Joined: Sat Jul 26, 2003 8:33 pm
- Location: Maryborough Queensland
Re: Something lie a WARF 2 - The Darto-Mick
Thanks Woody, the wood risers certainly look better than the metal ones. I know wood risers flex a little but that sure is a big difference in speed between them and the metal ones. It's not something I personally have an interest in testing but obviously it is something to consider if you are after speed alone.
Jeff
Jeff
Re: Something lie a WARF 2 - The Darto-Mick
As a post script to this thread... I think I posted something about the Morrison range a couple of years ago. But subsequently about November before last I bought a Tradtech Pinnacle - a Samick built 'wood' riser with ILF fittings. It is not centre cut, and has a radiused shelf. It is a 19" riser and works very nicely with the olympic style limbs drawing deceptively lightly though with a smattering of pinch due to the short overall length. It is both pretty and functional and achieves all of what a warf would (well... before the aussie 'south pacific peso' went through the floor and Lancaster raised their prices! ) and about its only limitation for a targeteer is the lack of centre shot and this need for a cant.
And if that is all there is to complain about... it must be pretty good.
And if that is all there is to complain about... it must be pretty good.