Where to source materials etc. Also the place to show off your new bow or quiver etc.... Making things belongs in Traditional Crafts.
Moderator: Moderators
-
greybeard
- Supporter

- Posts: 2992
- Joined: Tue Feb 07, 2006 9:11 am
- Location: Logan City QLD
#1
Post
by greybeard » Mon Jun 26, 2006 10:54 pm
Has your wooden bow run out of steam?
Some flat bows that I made needed that little bit of extra grunt for the longer targets.
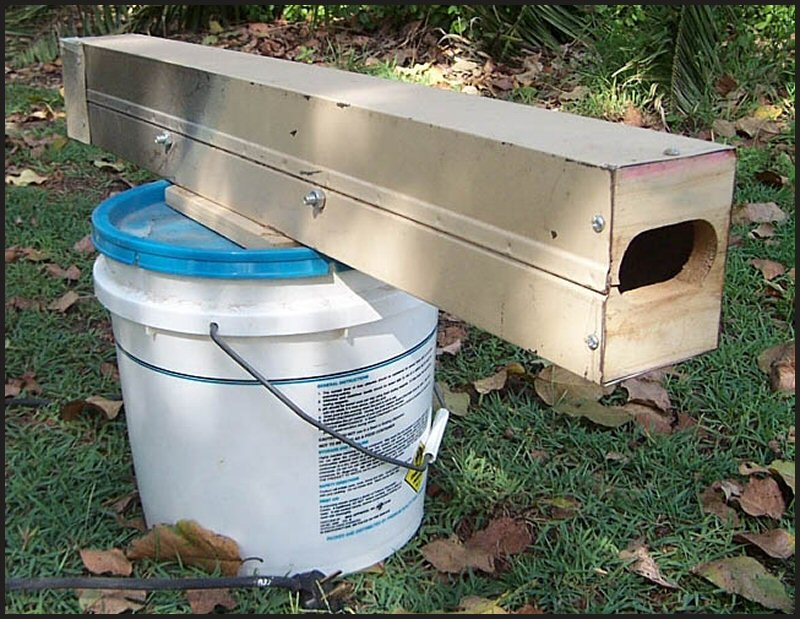
To overcome this problem I decided to recurve the tips. I had seen photos of bows being steamed over the stove using pots, pipe and aluminium foil but this seemed too cumbersome. I made up a portable steamer from bits and pieces using a heat resistant container with a tight fitting lid, some galvanised downpipe and an element from an old electric kettle. A hole in the lid with bung allows you to top up the water level when needed. The down pipe steaming tunnel is closed off on one end and has a reduced opening at the other end. I put bolts through the tunnel to support the limb being steamed.
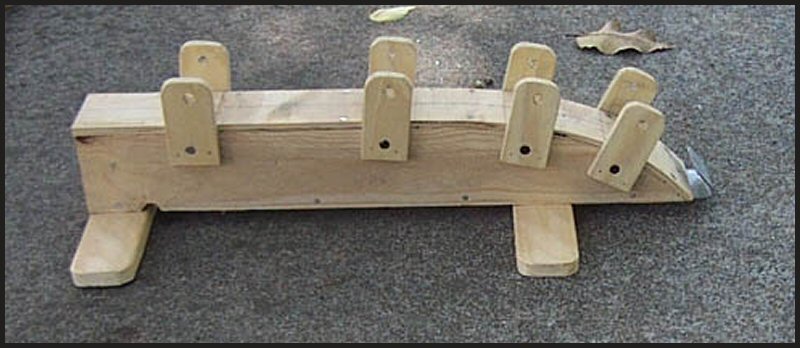
The form for bending the tips was made from scrap timber and plywood. The flat metal hook on the end of the form holds the tip and once the limb is gently pulled down the steel pins are put in place and the timber wedges tapped into place. To help contain the steam in the tunnel wrap some old cloth around the limb at the opening. During the steaming process be careful because steam can cause extreme burns. Be careful not to handle the steamed limb with an unprotected hand as this can also cause burns.
Daryl.
- Electric Steamer.jpg (146.69 KiB) Viewed 1414 times

- Steamer Lid 012.jpg (67.68 KiB) Viewed 1414 times
- Form To Recurve Tips on Flatbows.jpg (65.89 KiB) Viewed 1414 times

- Recurve Tip Red Ash Bow.jpg (26.95 KiB) Viewed 1414 times
Last edited by
greybeard on Thu Nov 03, 2011 7:49 pm, edited 1 time in total.
-
Graeme K
- Posts: 629
- Joined: Thu Feb 02, 2006 9:38 pm
- Location: Sydney Glenorie
#2
Post
by Graeme K » Tue Jun 27, 2006 5:35 pm
Hi Daryl
Looks like a good thing I think I will build myself one. Juat a little curious about how the plastic pail stands up to the boiling water. I would have thought the heat would make it very soft?
Graeme
-
Poppy
- Posts: 193
- Joined: Wed Mar 30, 2005 1:49 pm
- Location: Belli Park Sunshine Coast QLD
#3
Post
by Poppy » Tue Jun 27, 2006 5:44 pm
Hey Daryl, Did you say Steamer Or Did you mean STILL

(bits and pieces using a heat resistant container with a tight fitting lid, some galvanised down pipe and an element from an old electric kettle. A hole in the lid with bung allows you to top up the water level when needed. The down pipe steaming tunnel is closed off on one end and has a reduced opening at the other end)
If its a Still I'll take 2 Jugs

Paul
-
greybeard
- Supporter
- Posts: 2992
- Joined: Tue Feb 07, 2006 9:11 am
- Location: Logan City QLD
#4
Post
by greybeard » Tue Jun 27, 2006 8:26 pm
Hi! Graeme,
The pail has survived six steamings so far. You could use a metal container which is probably a lot better but at the time I only had a plastic one available. Test steam scrap timber to work out steaming times. I had to give red ash 1 1/2 hours. You can lose up to 50% of the curve once dried so make the form to suit ie a 3 inch curve needs a six inch form. When setting the curve you have to work fairly quickly. You can also use this method for bending heavier laminations.
Daryl.
****************
Hi! Paul,
The new stainless steel model could probably handle that request.
Daryl.