
The challenge was to make a shorter one that would be effective. To achieve this goal I used a Dean Torges type of adjustable form because this allows you to make all styles of bow on a single platform. With solid forms you need one for every style of bow.
The core laminations were glued both sides of the handle and tips added to strengthen the string grooves and then the back and belly bamboo laminations were added.
For the back and belly bamboo laminations the bigger the diameter of the pole the better which gives a flatter crown. It is advisable to have the plan of the bow marked out on the back core lamination so you can remove the excess before applying the final back and belly laminations. If need be make a cardboard template to enable you to mark out the shape on the outer laminations.
Cut the laminations to the template and remove the softer inner of the bamboo until you almost have a knife edge. By doing this you will get a natural taper in the lamination. The bamboo back is butt joined at the centre of the handle because I cut 'twins' so that the nodes are equally spaced on both limbs. Similarly I do the same with the belly lamination but cut in such a manner that these nodes fall in between the nodes on the back. With the adjustable form you can move the position of the posts and substitute different height posts to achieve the desired shape. I use 'F' clamps on the posts to pull the bow into the shape and small 'G' clamps on the limbs between the posts. You can make extra posts to suit each application.
If you are accurate with your laminations the bow will be 'almost tillered' when it comes out of the form. In your design allow up to an inch or so on the end posts to allow for string follow.
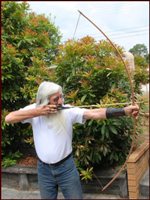
The bow is sixty one inches nock to nock, five and a half inch brace height and draws 50# @ 27". The core laminations are spotted gum (cut from a floor board) with the back and belly being bamboo. The hardwood and silver ash handle as well as the red ash tips came out of the off cuts box.
I had a bowyer friend test shoot it for me (as I have no shooting form at all) and he was able to group arrows in a five inch dot at thirty yards. He was surprised at the bows performance as he makes glass laminated longbows.
Not bad for a bow that cost under $25-00.
Daryl.
- Short Longbow Handle.jpg (35.18 KiB) Viewed 5143 times
- Short Longbow Tip.jpg (28.62 KiB) Viewed 5143 times
- Short Longbow.jpg (16.25 KiB) Viewed 5143 times