Osage bow build along

Where to source materials etc. Also the place to show off your new bow or quiver etc.... Making things belongs in Traditional Crafts.

Moderator: Moderators

Post Reply
Message
Author
User avatar
cmoore
Posts: 204
Joined: Tue Mar 18, 2014 9:35 am
Location: Melbourne VIC

Osage bow build along

#1 Post by cmoore » Wed Mar 19, 2014 11:28 am

Thanks again all for your warm welcomes...as I've just finished a bow now comes the time to start another...the stave in question is this 57" dark coloured and VERY heavy osage stave
20140319_113559-1-1_reduced.jpg
20140319_113559-1-1_reduced.jpg (23.06 KiB) Viewed 3835 times
Chasing a ring for the back has so far been a pain in the **** as they are close together and I've already violated one and had to chase a new one ...this is slow going and ive decided to go with my most accurate of tools
20140319_120144-1-1_reduced.jpg
20140319_120144-1-1_reduced.jpg (70.69 KiB) Viewed 3835 times
So progress is slow but accurate and its definatly faster than stuffing up and having to chase the next ring down! So ill be hunched over her for many an hour meticulously scraping away
20140319_120210-1-1_reduced.jpg
20140319_120210-1-1_reduced.jpg (74.07 KiB) Viewed 3835 times
Spent the better part of 40 minutes today scraping around this knot with a pocket knife
20140319_120720-1-1_reduced.jpg
20140319_120720-1-1_reduced.jpg (89.38 KiB) Viewed 3835 times
Thats where she's at so far...ill keep you all posted once im done chasing a ring and making her a bit more shapely :wink:
Set Happens

User avatar
greybeard
Supporter
Supporter
Posts: 2992
Joined: Tue Feb 07, 2006 9:11 am
Location: Logan City QLD

Re: Osage bow build along

#2 Post by greybeard » Wed Mar 19, 2014 11:50 am

cmoore wrote:Chasing a ring for the back has so far been a pain in the **** as they are close together and I've already violated one and had to chase a new one ...this is slow going and ive decided to go with my most accurate of tools:
The stave appears to be coming along nicely, are the growth rings well defined or do they tend to blend with each other.

I will catch up with your progress when I return from Wisemans Ferry.

Daryl.
"And you must not stick for a groat or twelvepence more than another man would give, if it be a good bow.
For a good bow twice paid for, is better than an ill bow once broken.
[Ascham]

“If a cluttered desk is a sign of a cluttered mind, of what, then, is an empty desk a sign?” [Einstein]

I am old enough to make my own decisions....Just not young enough to remember what I decided!....

User avatar
Mick Smith
Posts: 4957
Joined: Mon Feb 21, 2005 9:09 pm
Location: Surf Coast Victoria

Re: Osage bow build along

#3 Post by Mick Smith » Wed Mar 19, 2014 2:01 pm

Good stuff! I'm very interested in what you're doing.

I now only buy staves that have medium to wide growth rings. Not only are they more likely to make a stronger and more durable bow, in my opinion, they're much easier to take down to the one growth ring.

I'm looking forward to future updates.
There is no use focusing on aiming if you don't execute the shot well enough to hit what your are aiming at.

User avatar
bigbob
Posts: 4098
Joined: Sat Jul 10, 2010 8:55 pm
Location: sunshine coast

Re: Osage bow build along

#4 Post by bigbob » Wed Mar 19, 2014 3:31 pm

good work , looking forward to up dates as you go along.
nil illigitimo in desperandum carborundum
razorbows.com

User avatar
cmoore
Posts: 204
Joined: Tue Mar 18, 2014 9:35 am
Location: Melbourne VIC

Re: Osage bow build along

#5 Post by cmoore » Wed Mar 19, 2014 4:38 pm

greybeard wrote:The stave appears to be coming along nicely, are the growth rings well defined or do they tend to blend with each other.l.
Yea they meld and blend into each other at various points in the stave, the rings at one end are medium and at the other end they're tight so it adds up to be quite a challenge :mrgreen:
Set Happens

User avatar
Mick Smith
Posts: 4957
Joined: Mon Feb 21, 2005 9:09 pm
Location: Surf Coast Victoria

Re: Osage bow build along

#6 Post by Mick Smith » Thu Mar 20, 2014 3:58 pm

Do you have much of an idea of what shape the bow will eventually have? I like the idea of building a pyramid bow one of these days, or perhaps something more along the lines of a Holmegaard style of bow with relatively wide limbs and very narrow tips.
There is no use focusing on aiming if you don't execute the shot well enough to hit what your are aiming at.

User avatar
cmoore
Posts: 204
Joined: Tue Mar 18, 2014 9:35 am
Location: Melbourne VIC

Re: Osage bow build along

#7 Post by cmoore » Thu Mar 20, 2014 8:14 pm

Yea im thinking along the lines of a holmegaard...the stave's crying out to be made into a molle but I hate the looks of those bows....if I had a bit more width on what will be the bottom limb I'd do a California style flat bow
Set Happens

Dennis La Varenne
Posts: 1776
Joined: Sun Sep 07, 2003 10:56 pm
Location: Tocumwal, NSW. Australia

Re: Osage bow build along

#8 Post by Dennis La Varenne » Thu Mar 20, 2014 9:30 pm

I have made a lot of bows from Osage and I agree with Mick that the best Osage is that with the very wide summer growth rings and very fine early growth rings. Apart from being easier to follow, the wood is usually much denser, springier and stronger. The limbs tend to be very thin, perhaps two to three growth rings to a limb thickness for a 60+ lb bow. The physical size of the bow also tends to be smaller for the same draw weight.

Attached are a few pics of a very old Osage flatbow I recently bought through eBay. It has very few growth rings in the limbs and draws in the mid-high 60lbs and is only 62 inches long. The back-belly profile is classically American flatbow of beautiful symmetry.I have three by the same maker - a bloke by the name of Morgan. He made his Osage bows in the 1930s and they are still almost dead straight.

At its widest, the limbs are 1 ¾ inches and the tips are ⅜ inch wide at the nock. The handle is bulbous and 1 ¼ in deep under the wrapping. So if you have a good stave there cmoore, and it sounds like you have, you could well end up with a spectacular bow with a modicum of care.
Back.jpg
Back.jpg (61.66 KiB) Viewed 3752 times
Belly.jpg
Belly.jpg (70.97 KiB) Viewed 3752 times
Grip-with-inlaid-horn-arrow-plate.jpg
Grip-with-inlaid-horn-arrow-plate.jpg (89.93 KiB) Viewed 3752 times
Osage-flatbow-66#-x-62in..jpg
Osage-flatbow-66#-x-62in..jpg (126.69 KiB) Viewed 3752 times
Dennis La Varénne

Have the courage to argue your beliefs with conviction, but the humility to accept that you may be wrong.

QVIS CVSTODIET IPSOS CVSTODES (Who polices the police?) - DECIMVS IVNIVS IVVENALIS (Juvenal) - Satire VI, lines 347–8

What is the difference between free enterprise capitalism and organised crime?

HOMO LVPVS HOMINIS - Man is his own predator.

User avatar
cmoore
Posts: 204
Joined: Tue Mar 18, 2014 9:35 am
Location: Melbourne VIC

Re: Osage bow build along

#9 Post by cmoore » Thu Mar 20, 2014 10:42 pm

What a beautifully crafted bow :biggrin: ... I think I'll model mine after it as a tribute to a tried and tested design....I may go 2" at the widest point of the limbs and taper to 3/8....this will be an unbacked bow as im only shooting for about 24" of draw...building her to match my quirky technique, I have a 30" draw yet always lean into my shots and only draw to 24" before I snap the shot off :roll: dont know why but ive always shot that way apart from when I used to shoot a compound...now that Ive said the C word I need to go wash my mouth out with soap :lol:
Set Happens

User avatar
bigbob
Posts: 4098
Joined: Sat Jul 10, 2010 8:55 pm
Location: sunshine coast

Re: Osage bow build along

#10 Post by bigbob » Fri Mar 21, 2014 6:56 pm

Jeez Dennis your workshop looks like an engineers shop!
nil illigitimo in desperandum carborundum
razorbows.com

Dennis La Varenne
Posts: 1776
Joined: Sun Sep 07, 2003 10:56 pm
Location: Tocumwal, NSW. Australia

Re: Osage bow build along

#11 Post by Dennis La Varenne » Fri Mar 21, 2014 11:09 pm

Bob,

That workshop belongs to the bloke who sold me the bow on eBay. It isn't mine, but I wish it were.

cmoore,

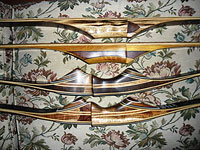
The first picture above shows the back of the bow. It is unbacked and Osage does not need any kind of backing if it is a log bow and a growth ring is followed as well as this one is. I have another similarly designed bow which has some very nice 'witch's pimples' on its back is the same length but 2 ¼" wide and has ⅝" wide tips. The back is equally as beautifully done.

If you copy this styling of bow, you could make your bow a lot shorter than 62 inches without stacking. If you make your bow (2 x draw length) + riser length, your bow could be under 60 inches. At your proposed 2 inches wide, the limbs would be very thin and almost certainly take little or no set.

The bow in the picture has no set at all despite showing signs that it has been well used - one of the principal benefits of the wide thin-limbed flatbow. For your short draw, you need to make sure that the load on the limbs is as much as Osage can stand in order to obtain a high 'dry-loose' (Daryl - please note) speed which is the theoretical speed at which the limbs travel when there is no arrow on the bow. The quicker the dry-loose speed, the quicker the bow will push a given arrow. This theoretical state is brought about by having a design where the limbs are taking the maximum amount of bending load which the wood can take without exceeding (by much) its elastic limit and having the tips as light as possible.

A lot of my old Lemonwood target bows in my collection have tips which are ⅜" wide and barely ¼" thick with no more than another ¼" of tip extending out past the string nocks. Even at draw weights from 30 - 45lbs, they are surprisingly quick for a wooden bow. Even though these Lemonwood bows are longer at 66 - 68" nock to nock, the distribution of limb mass is well thought out with most of the limb mass within the inner ⅔ of the limb.

One of these has 2 ½" of set and is still as quick as any of the other 6 or 7 I have from the same maker and within the same weight range. Must be a superior piece of Lemonwood. With a 9gn/lb arrow, it still strikes 16 to 18 inches above the aimpoint at 35m when placing the tip of the arrow on the aimpoint ('point-of-aim' shooting).
Dennis La Varénne

Have the courage to argue your beliefs with conviction, but the humility to accept that you may be wrong.

QVIS CVSTODIET IPSOS CVSTODES (Who polices the police?) - DECIMVS IVNIVS IVVENALIS (Juvenal) - Satire VI, lines 347–8

What is the difference between free enterprise capitalism and organised crime?

HOMO LVPVS HOMINIS - Man is his own predator.

User avatar
cmoore
Posts: 204
Joined: Tue Mar 18, 2014 9:35 am
Location: Melbourne VIC

Re: Osage bow build along

#12 Post by cmoore » Thu Apr 24, 2014 9:41 am

Heres how she came out!, ill put more detailed pics up soon :biggrin: 29#@23" ...57" ntn with a 4" handle and 1 1/4" fades, she had a high crown so I didn't want to stress her out to much. So with my limited bow making experience just went light weight but not to light, let me know all your thoughts on the tiller
Cheers
20140412_100239_16496-1-1.jpg
20140412_100239_16496-1-1.jpg (34.8 KiB) Viewed 3654 times
Set Happens

User avatar
bigbob
Posts: 4098
Joined: Sat Jul 10, 2010 8:55 pm
Location: sunshine coast

Re: Osage bow build along

#13 Post by bigbob » Thu Apr 24, 2014 10:11 am

It looks like you have done a great job with the tiller. To my eye it looks like the top 1/3 of the upper limb could possibly use bit light scraping but overall great job especially given the close rings.
nil illigitimo in desperandum carborundum
razorbows.com

Peregrine
Posts: 46
Joined: Tue Apr 23, 2013 2:53 pm

Re: Osage bow build along

#14 Post by Peregrine » Thu Apr 24, 2014 12:46 pm

Fantastic! Well done! Hope you have fun shooting it!

User avatar
greybeard
Supporter
Supporter
Posts: 2992
Joined: Tue Feb 07, 2006 9:11 am
Location: Logan City QLD

Re: Osage bow build along

#15 Post by greybeard » Thu Apr 24, 2014 5:02 pm

cmoore wrote:let me know all your thoughts on the tiller
I think that how the bow feels in the hand when being shot is more important than how the tiller looks.

If the bow is rough in the hand when being shot chances are that the limb timing is out. Experiment with the pivot point.

Super impose the upper and lower limbs [braced] shoot a heap of arrows and note the changes. Rework the tiller if necessary. See link.

http://www.ozbow.net/phpBB3/viewtopic.php?f=34&t=11566
Osage Tiller.jpg
Osage Tiller.jpg (69.91 KiB) Viewed 3629 times
Personally I would shoot the bow and make adjustments if needed.

Daryl.
"And you must not stick for a groat or twelvepence more than another man would give, if it be a good bow.
For a good bow twice paid for, is better than an ill bow once broken.
[Ascham]

“If a cluttered desk is a sign of a cluttered mind, of what, then, is an empty desk a sign?” [Einstein]

I am old enough to make my own decisions....Just not young enough to remember what I decided!....

Post Reply